Guys we will try to make this as Foolproof and Fast to do as possible. We unlock them all, and know that some of them can be a pain to get to. We will also offer you some brief overview of each class Strengths AndWeakness. So with that out of the way here is your guide to all vocations in the game.
We can start with a quick note about the Archer, Fighter, Thief, and Mage. These are your 4 starting vocations and you unlock them by finishing making your character. It’s as simple as that. Now let us go through all of them.
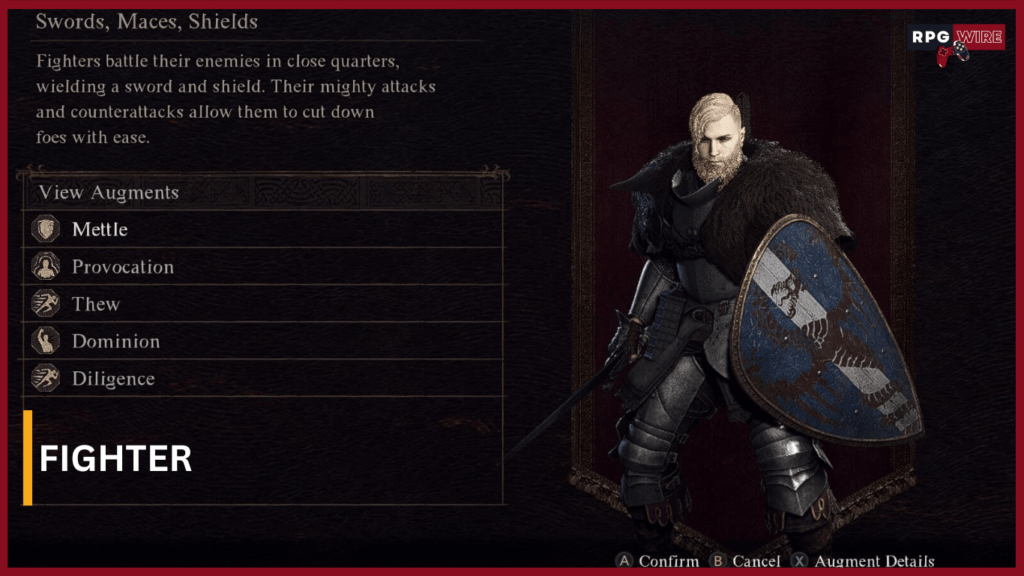
1. Fighter
Fighters are your frontline. They sport a sword and board as their weapon of choice. Their skills encompass a tool for every situation and with all of that combined it makes them a great allrounder.
Strengths:
Best tank
High HP
Heavy armor, great stagger resistance
Allrounder skillset
Fast and impactful attacks
Weakness:
Jack of all trades master of none
Trouble reaching flying enemies
Lacks Good AOE options
If you want to be in front of monster faces, blocking and parrying their attacks, and have a toolkit to deal with any situation while still dealing respectable damage this is the vocation for you.
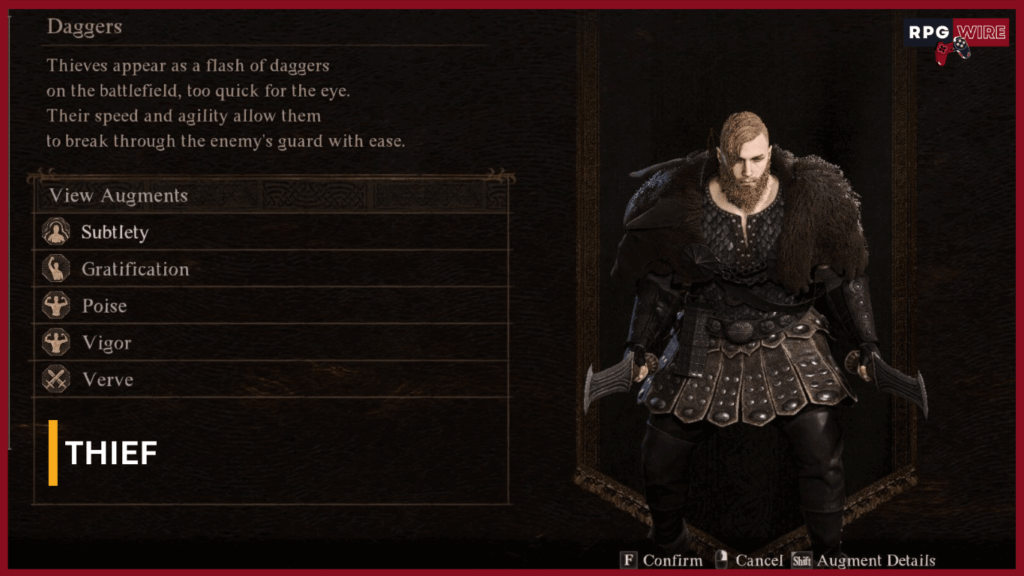
2. Thief
Thief is the most agile class. Their weapon choice is dual daggers. Their skill set is focused on evasion, targeting the monster’s weak points, and dealing with flying units.
Strengths:
Fastest attacks in the game
Most evasive vocation
Great for climbing up big monsters
Amazing skills for targeting weak points
Weakness:
Lacks knockdown power
Light armor and low hp
Lacks good AOE options
For those of you who want to zip around dogging attacks and being so agile that you never get hit while jumping on a monster’s back and climbing up until you reach their eyes so you can stab the shit out of them or stick a bomb in their mouth this is the vocation for you.
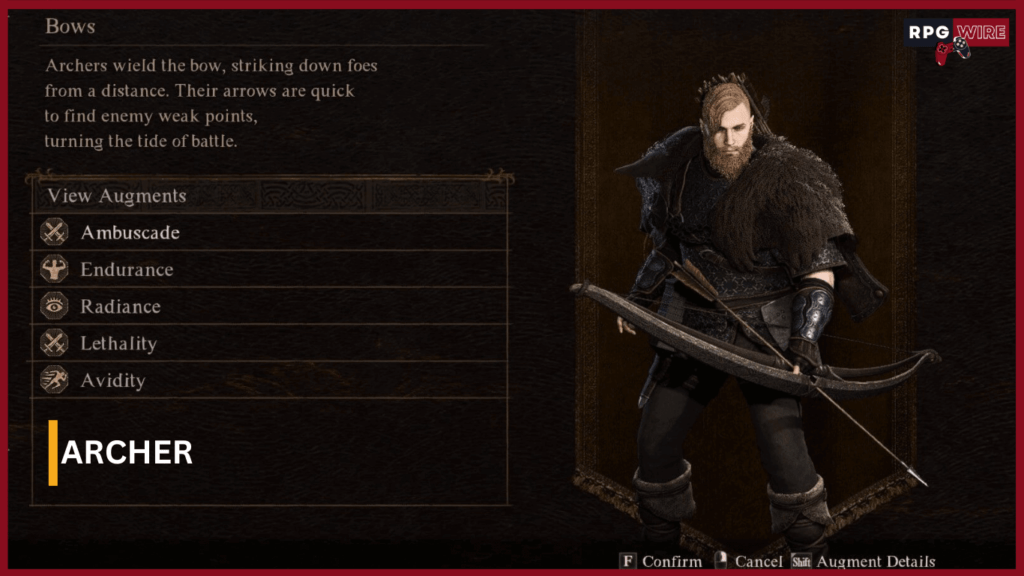
3. Archer
Archers are masters of ranged combat. The weapon of choice is a bow (no crossbows in this game, unfortunately). They can use specially crafted arrows to inflict different status effects on the monsters and are excellent at taking out flying enemies and always shooting weak spots that other vocations would struggle to reach.
Strengths:
Close to 100% uptime on weak points
Special arrows are great for targeting weaknesses
Best at dealing with flying enemies
Weakness:
Stagers easily
Light armor and low hp
Do you like Legolas? Do you like having an arrow for every situation like a superhero from comic books? Do you like shooting stuff from afar rather than being in their faces where they can swipe at you. Look no more, you found your vocation.
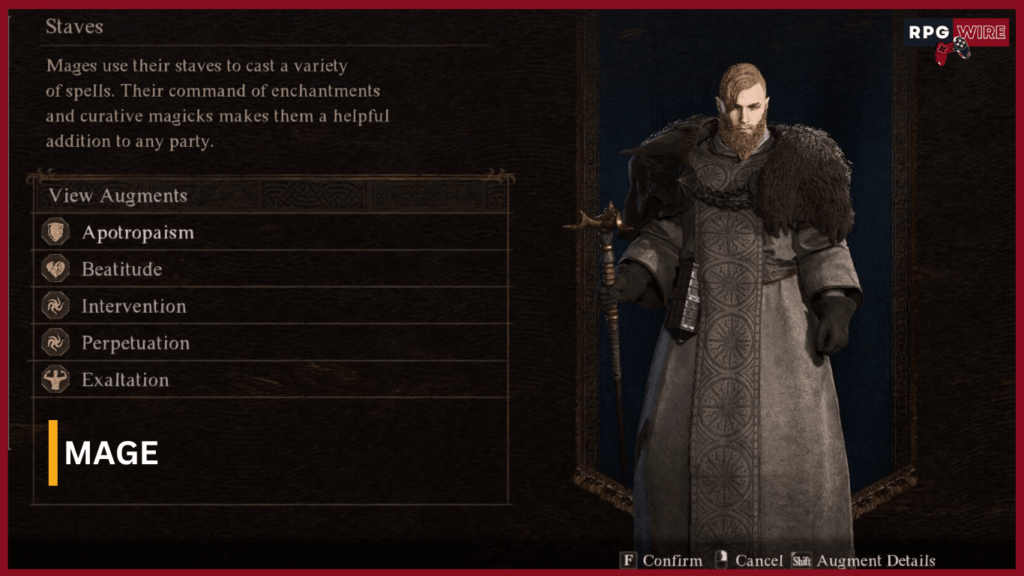
4. Mage
Mages are masters of all types of spells, offensive and supportive alike. The weapon choice is a Stave. Their skills include elemental spells and spells to heal and buff up your pawns. This is one Vacation that no party should be without, their support toolkit is that good.
Strengths:
Best healing and team support in the game
Great magic defense
Good AEO attacks
Spells to deal with any situation
Weakness:
Light armor and low HP
Stagers easily
Lacks knockdown power
Gandalf is your boy, you have a long gray beard or are a young but wise lady. If you want to dish out damage, help your teammates, and be the only vocation that everyone truly needs you found your calling.
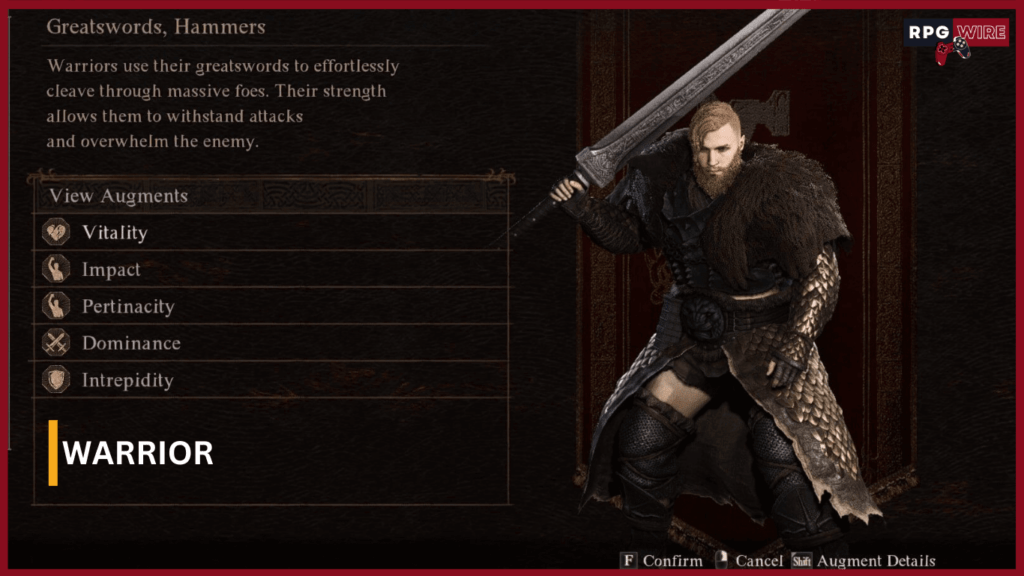
5. Warrior
Warriors are masters of melee combat. They sport a Greatsword or Greathammers and Axes as their weapon of choice. Their skillset is focused on charged attacks that are great at knocking down enemies.
Strengths:
High Hp
Heavy armor, great stager resistance
Best Stagger and knockdown potential in the game
Massive single-target burst damage
Weakness:
Slow attacks and attack recovery
Trouble reaching flying enemies
You like Guts from Berserk and you want to be just like him. You want a big f-in sword so you can swing it in big f-in heads of big f-in monsters. And when you hit them and it knocks them down on their ass so you can jump on their heads, and do a charged attack that will DEMOLISH their HP in one swing. Sounds good? I bet it does.
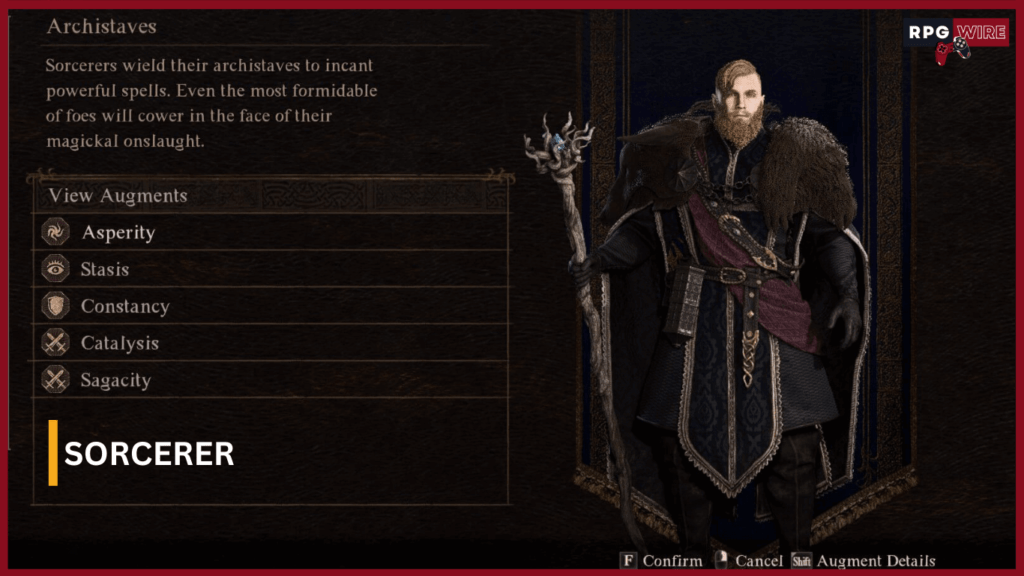
6. Sorcerer
Sorcerers are offensive mages. They forgo buffing the party and healing and trade it for massive elemental AOE damaging spells. They wield an arch staff and their skill set focuses on elemental damage and debilitations.
Strengths:
Best AOE damage in the game
Great magic defense
Great control effects
Can deal dmg from every element in the game
Weakness:
Light armor and low HP
Stagers easily
Long charge-up time for spells
If you ever played Final Fantasy and know what a black mage is and you love that slow charge-up time to do absolutely massive spells like summoning meteors and tornadoes this is the vocation for you.
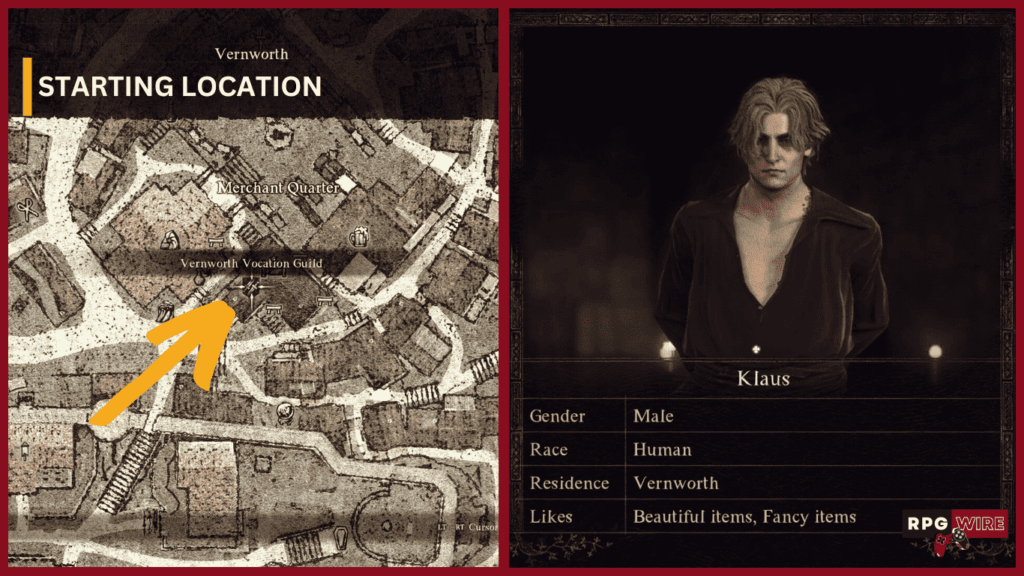
How to unlock Warrior and Sorcerer
These two Vocations are the easiest to unlock. All you need to do is follow the storyline until you reach the main city.
When you reach it, make your way to the vocation guild and talk to Klaus. He will tell you that you can’t change into a warrior or sorcerer because a shipment of weapons for those respective vocations got stolen. This will unlock a quest VocationFrustration.
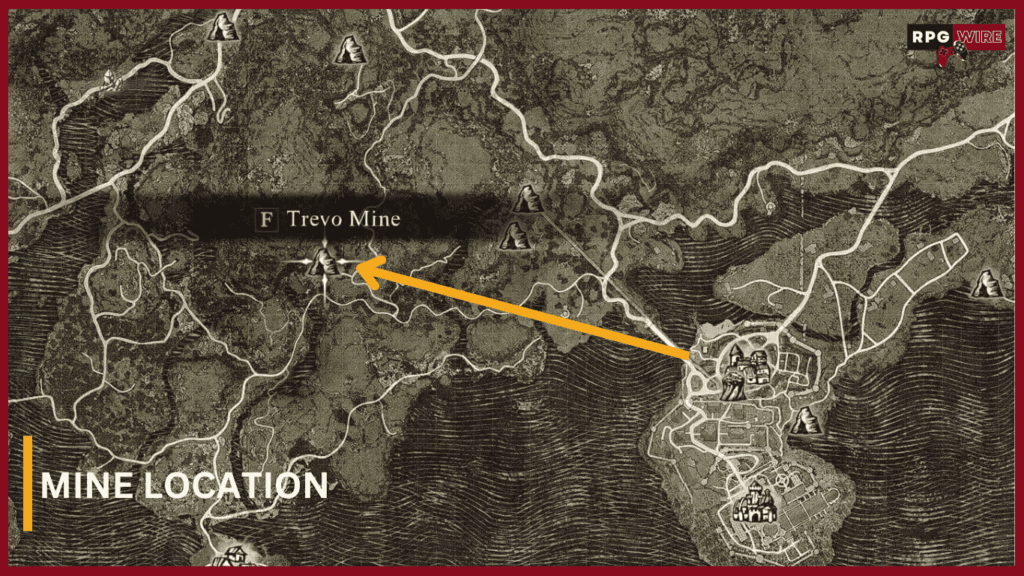
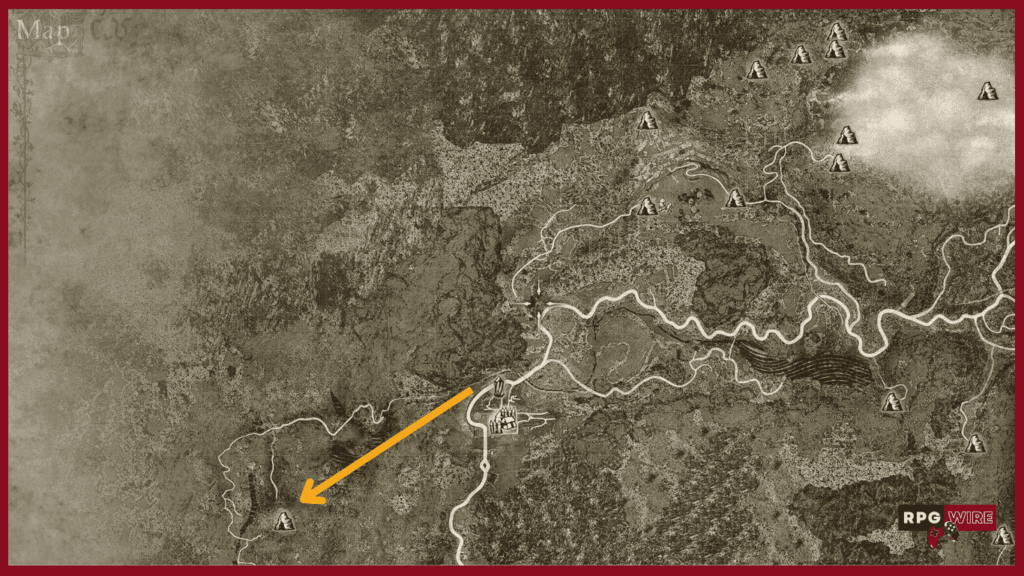
Before you embark on recovering the weapons, talk to the guy who sells them named Roderick. He has a shop up in the Merchant Quarters. He will inform you that Goblins are behind the theft and are hoarding the weapons somewhere along Western Road. That somewhere is in Trevo Mine right here on the map.
Make sure to search the cave thoroughly for two fancy-looking chests. One will contain a Two-Handed Sword and the other the Archstaff. Bring them back to Klaus to unlock your new Vocations.
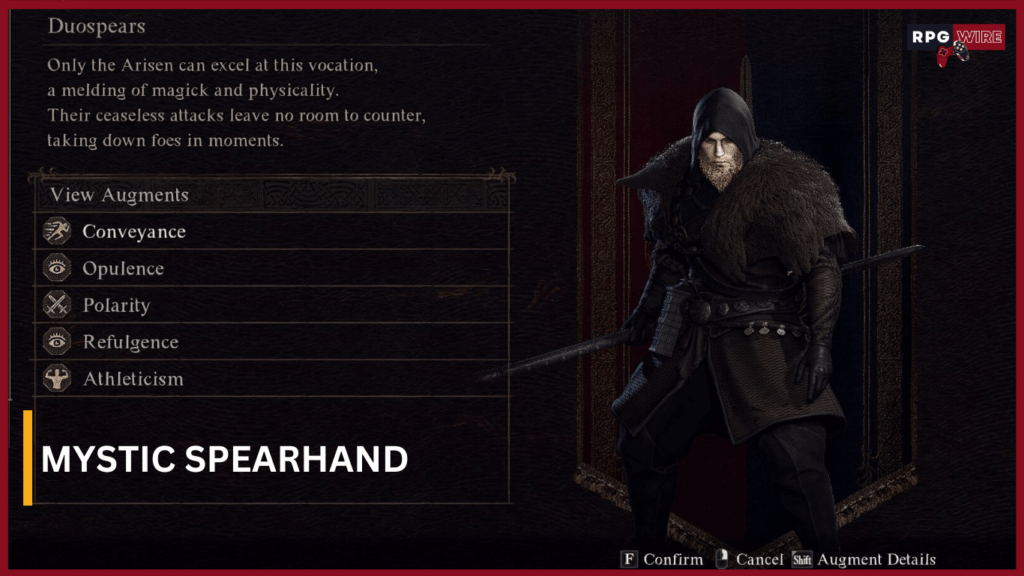
7. Mystic Spearhand
Mystical Spearhand is a hybrid vocation utilizing melee attacks and magic. Their weapon of choice is a dual spear(Darth Maul style weapon). Their skill set focuses on dishing out magical attacks from afar and quick, close and personal, fast spear combos.
Strengths:
Physical and magical attacks
Allrounder skillset
High mobility
Fastest at killing normal enemies
Weakness:
No dodge or Block
Here are a few prerequisites to unlocking it:
You have to reach the main town
You have completed the quest “monster culling”
To reach the main town just follow the main quest and you should be there in the first few hours of the game.
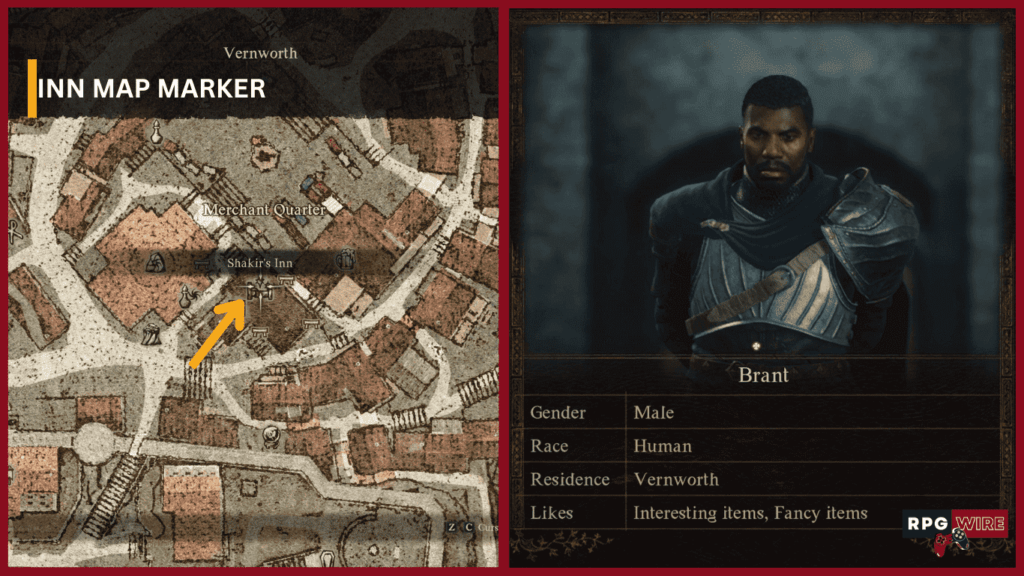
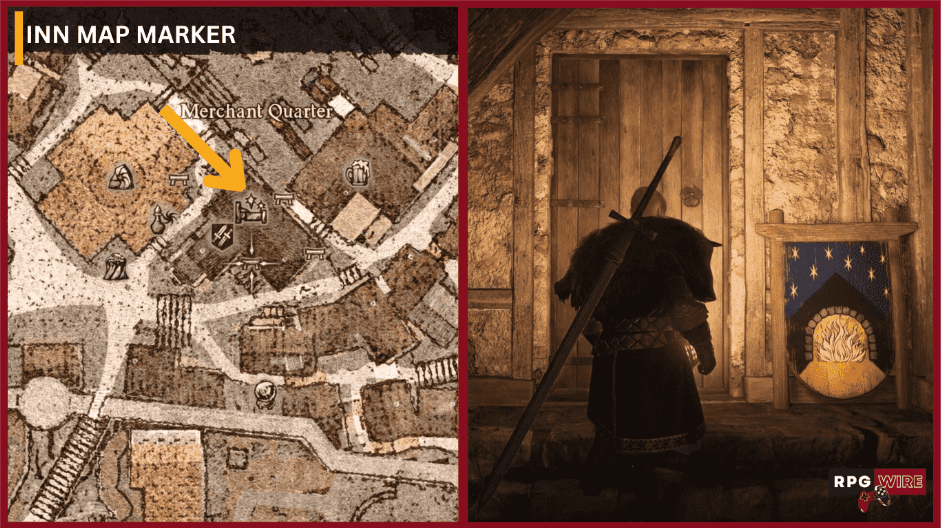
After you reach it, talk to Captain Brant and on the list of quests he can offer there will be a quest called “Monster Culling”. You can find him at the Inn in the middle of the town, he hangs in there at nights.
After you complete the quest take the Oxcart back to the Melve village, where you started your adventure from.
Upon reaching the village you will find it under siege from a Dragon. Join in the fight and after you and the good citizens of the village do enough damage the Dragon will fly away (unrelated this is also start of the another quest line Readvent of Calamity).
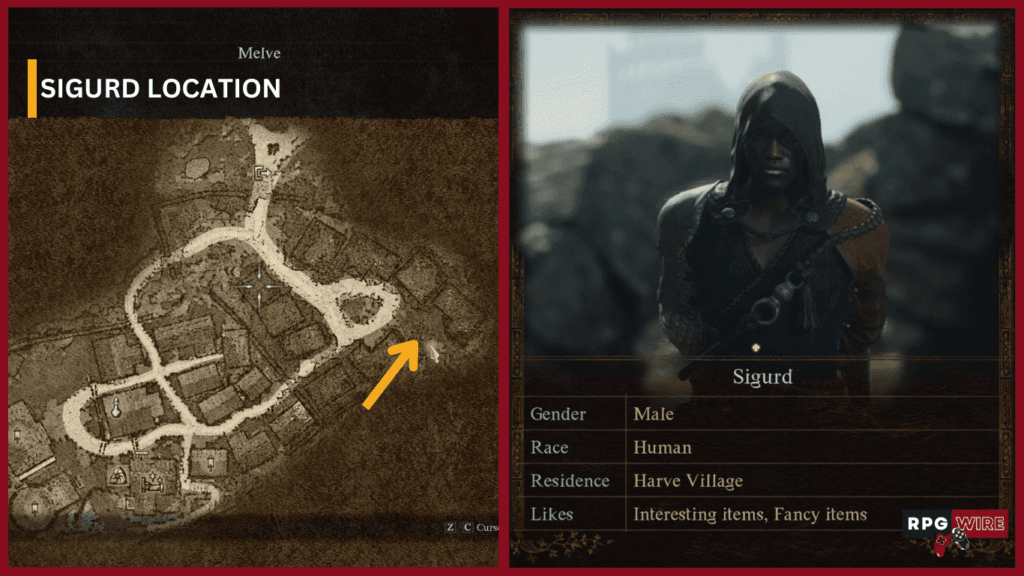
Now find a hooded fighter with a long spear on his back. His name is Sigurd and he hangs near the entrance around all the burned houses. Talk to him and ask him about his fighting style and you will unlock your new vocation.
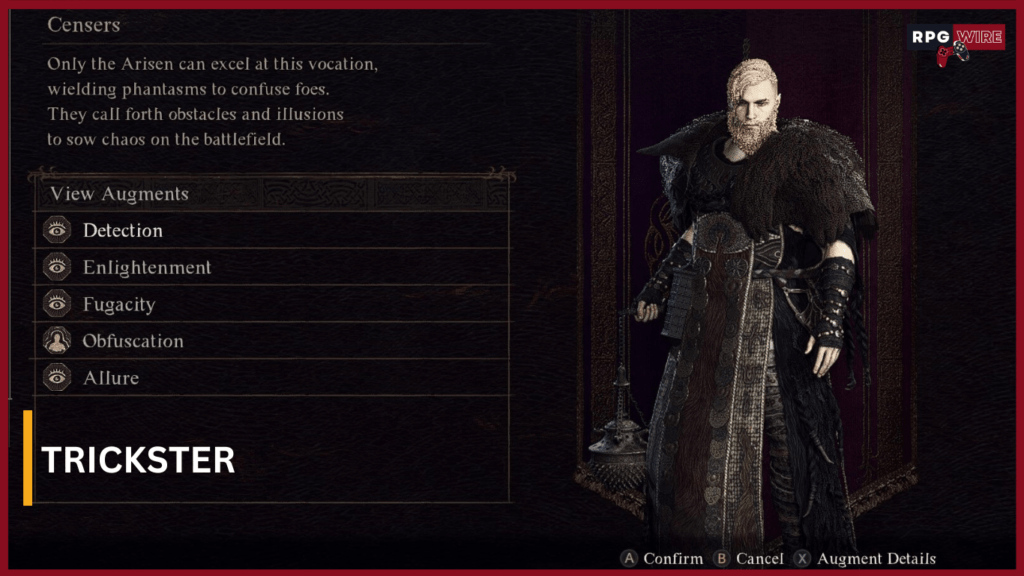
8. Trickster
Trickster is a unique vocation that is great for support and creating multi-purpose illusions. You can use the illusions to make enemies jump off cliffs, Buff your allies and Debuff your enemies (This Vocation would be something closest to a Necromancer minion build). Trickster wields the Censers. Their skills are focused on taunting and confusing enemies, supporting allies, and creating environmental illusions.
Strengths:
Strongest buffs in the game
Taunting enemies
High Knockout power
Using terrain to get kills
Weakness:
No good normal attack option
Heavily reliant on pawns
Most skills are highly situational
To unlock the Trickster first you will need to make your way to the next region called Battahl.
We suggest you follow the main story and get to it that way, but if you just want to speed run to the region so you can unlock one of these advanced vocations, we will explain how to do so.
There are several methods to do this but for the sake of keeping this article on point, we will give you the one we find to be the simplest.
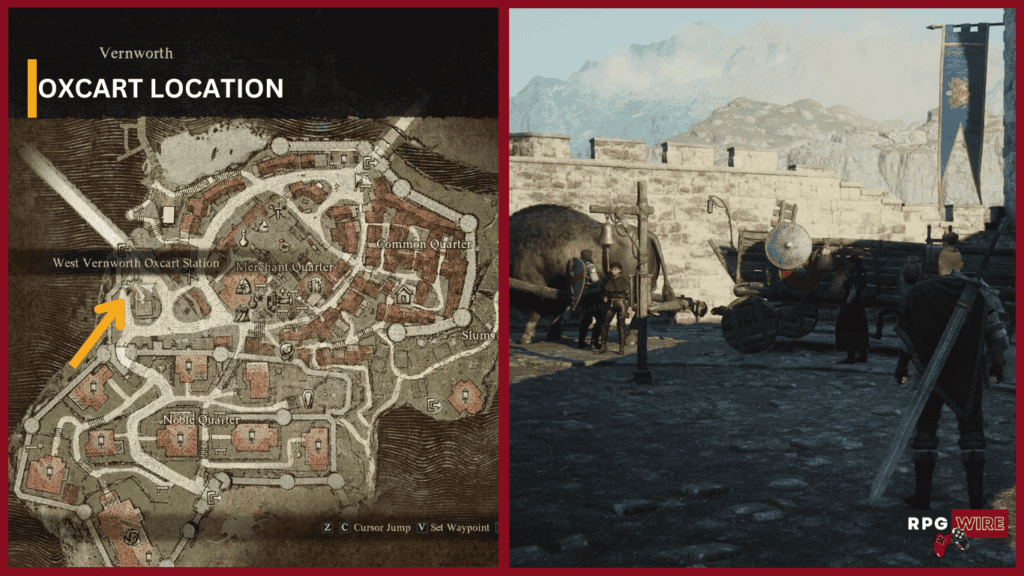
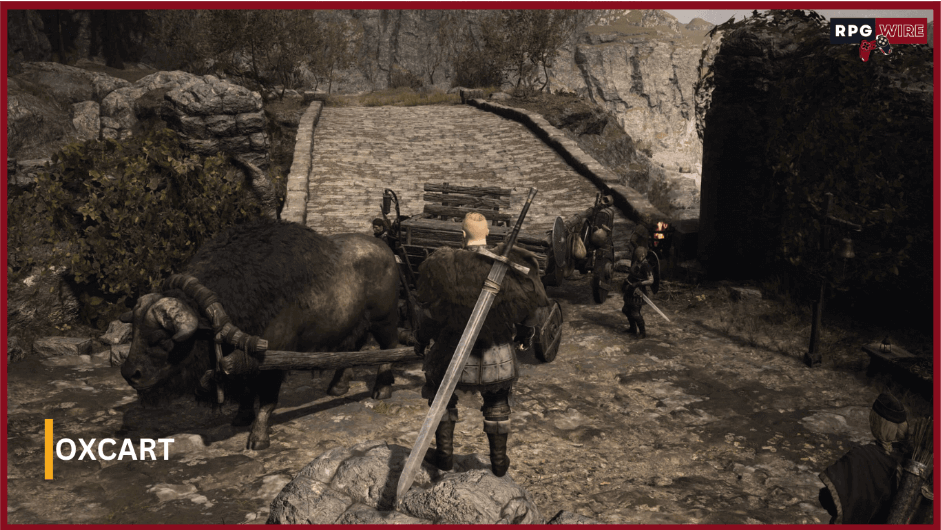
First, you will take a Oxcart to Checkpoint Rest Town from the main city of Vernworth.
You can find the cart in this location.
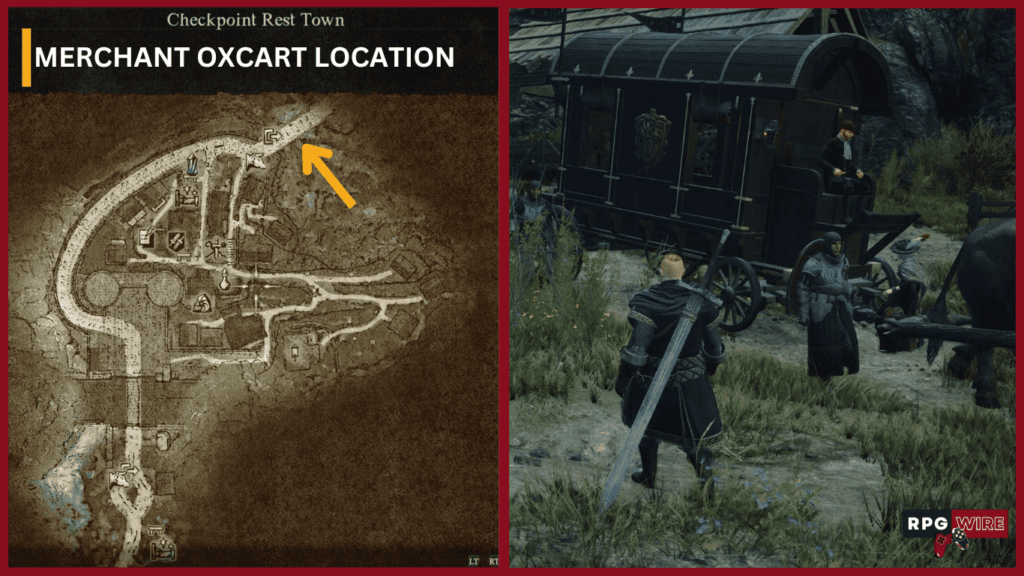
After you reach the town you can stay on the bridge and look around for a different type of Oxcart.
It is a fancy-looking Merchant Oxcart that trades between two main cities. You can simply wait on the bridge or use one of the nearby benches to skip time until it shows up.
After it pops up all you need to do is jump into it, and the cart will take you through the gates with no one being none the wiser.
Now that we have all that out of the way the last thing you need to do is follow the main road and take a side path to the Reverent Shrine right here on the map.
Talk to the Illusion of a Trickster Maister named Luz and you will unlock your new Vocation.
On a side note, if you want to know where the real Maister is find the ladder on the side of the temple and climb to the roof, she will be impressed you found her and will reward you.
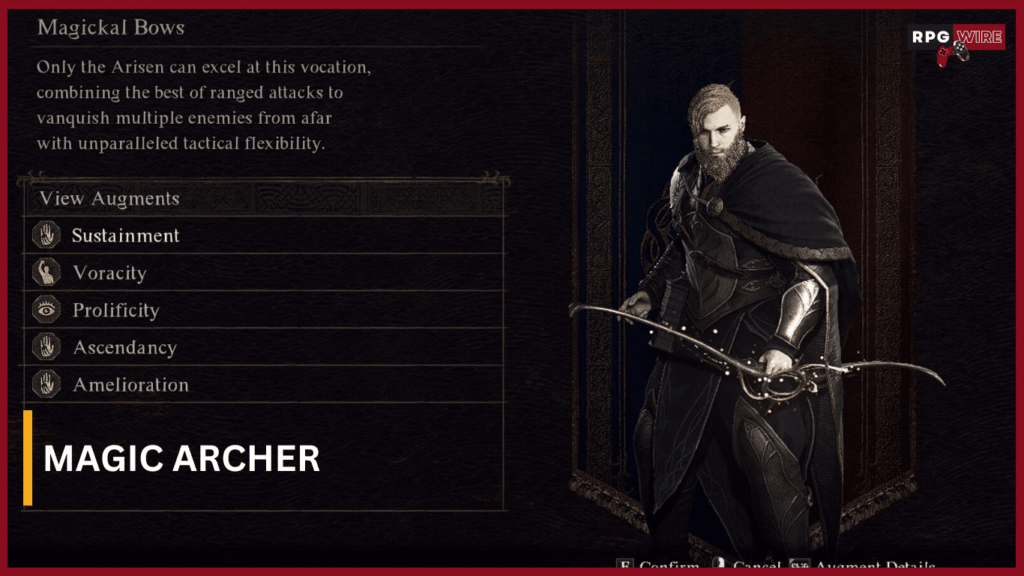
9. Magic Archer
Magic Archer is a vocation that specializes in dealing both Aoe and single target dmg magical damage through a bow. Their Weapon of choice is a Magick Bow. They have a great skill set both suited to dealing damage and buffing and healing allies.
Strengths:
Close to 100% uptime on weak points
Great Aoe and single target damage
Can deal with flying enemies easily
Can Heal and buff allies
Weakness:
Stagers easily
Light armor and low hp
Long charge-up time for Attacks
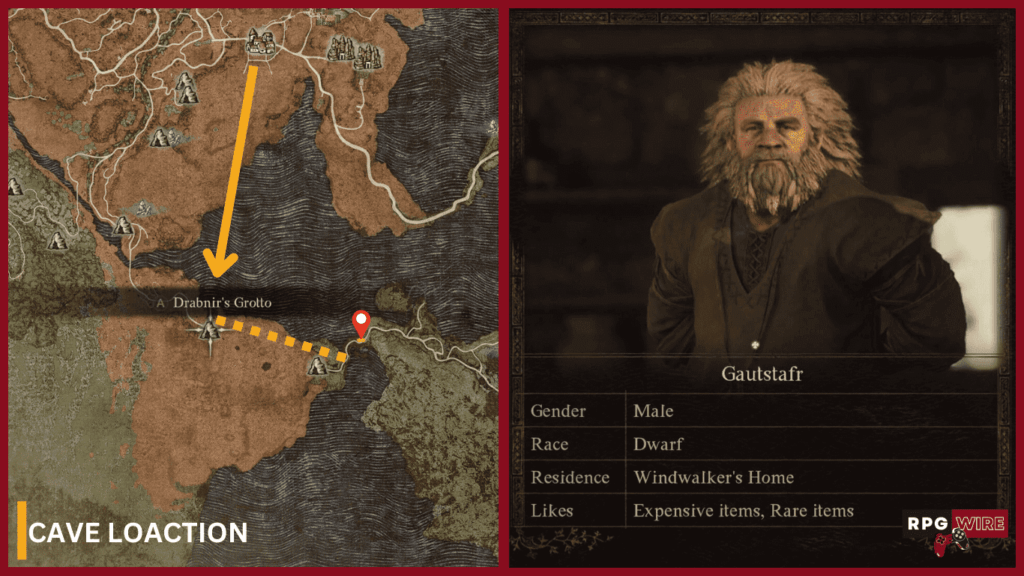
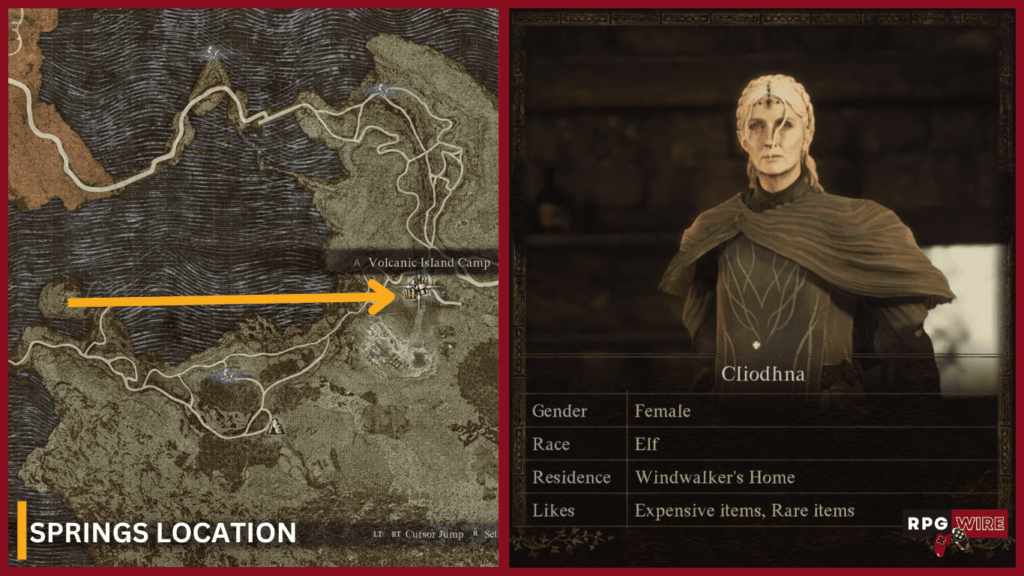
To Unlock the magic archer you will need to make your way back to the Volcanic Island Region of the game, where you were working as a slave.
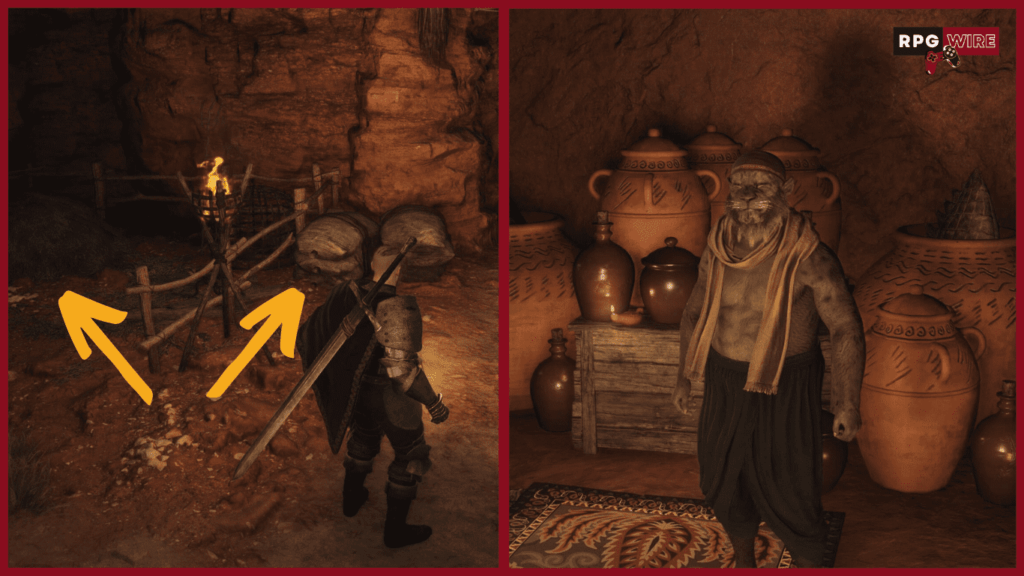
After you unlock the Battahl region it’s as simple as walking south from the main city, until you reach this cave called Drabnir Grotto. Pass through the cave and on the other side few meters down the main road there will be an Old man with back problems named Gautstafr.
He will need your help to get back to his house called Windwalker Home (it will be marked on your map once you accept the quest). Escort the poor dude and give him any medical herbs you have lying around in your inventory.
After he is done arguing with his wife Cliodhna he will go inside to get your reward and his back will crack again.
Unfortunately, this Dwarf was probably deadlifting with a poor form his whole life
This time your herbs won’t do, and you will have to take him to the curative springs in Volcanic Island Camp right here on the map.
After you are done with your escort quests his wife will show up and you will unlock your new Vocation.
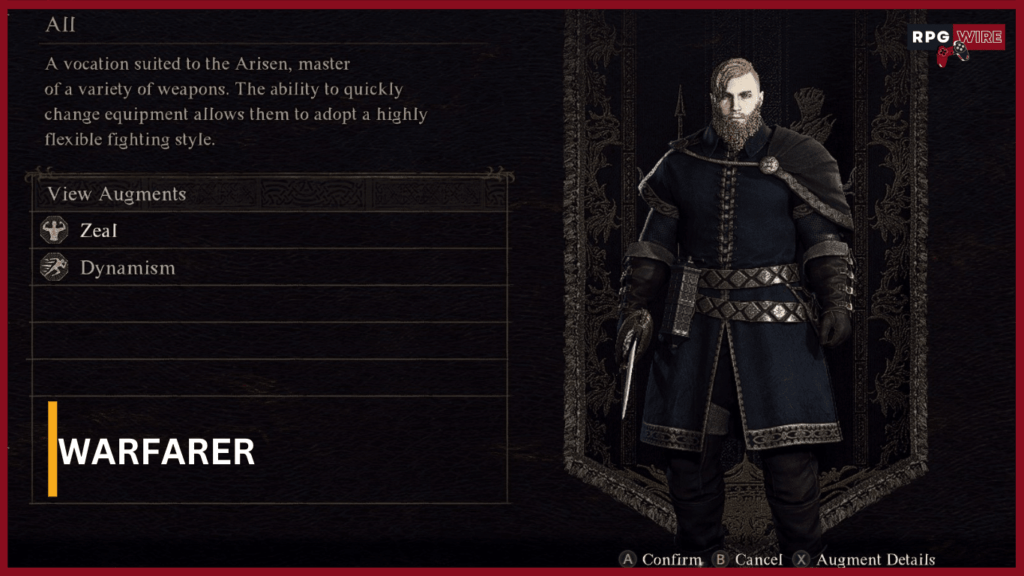
10. Warfarer
Warfarer is a vocation that can use all the weapons and armor in the game and their associated skills. Wayfarer has a special skill that lets you equip multiple weapons and swap them in the middle of combat. You can mix and match anything you want to achieve your perfect build.
Strengths:
Most versatile vocation in the game
Can use all the weapons and armor in the game
Can swap between weapons in combat
Weakness:
Cant use ultimate abilities of vocations
Has worse stats than original vocations
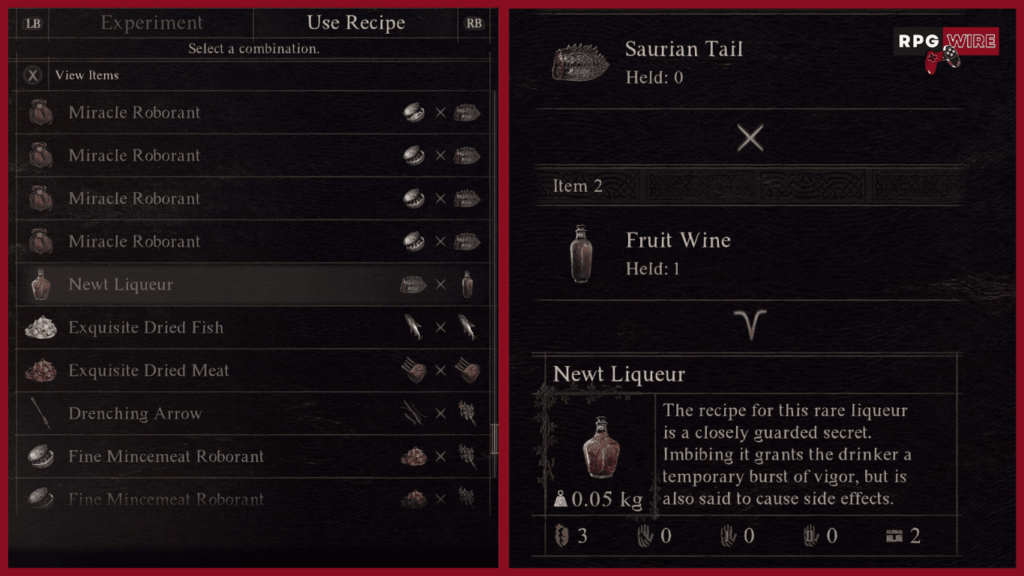
Before we can unlock the Warfarer you will have to go shopping for some Booze. Yes, i am being serious.
Specifically, the Maister of this vocation has a special hooch in mind called Newt Liqueur and you will need 3 in total.
Now there are a couple of ways to get this item. If you are lucky enough to have Fruit Wine in your inventory you can combine it with Saurian tails.
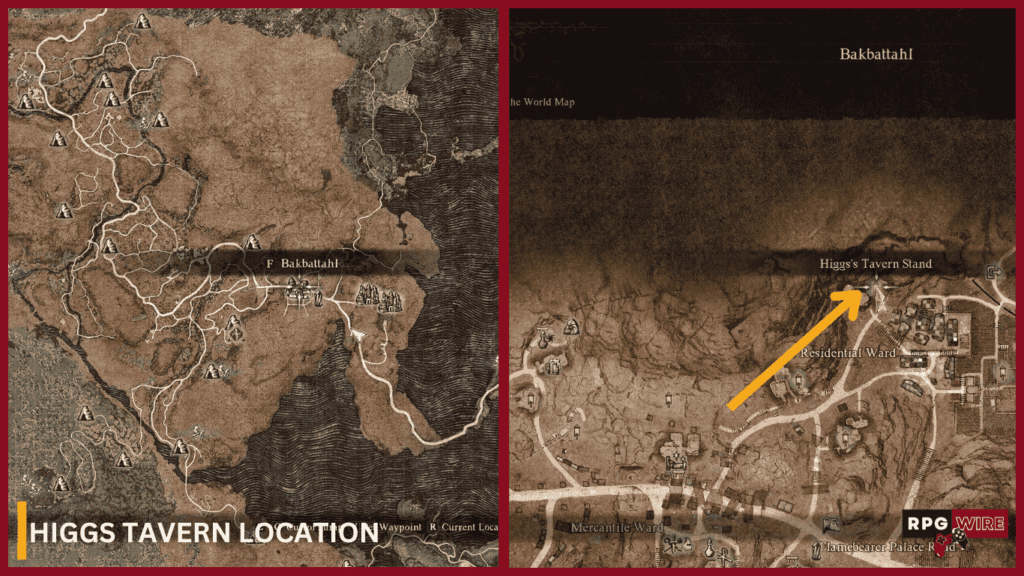
Otherwise, go to the main city of Battahl region called Bakbattahland and make your way to the Higgs Tavern stand.
(This step is optional but doing it will mean you won’t have to fight the guards). Put a Beastren mask on, that you can buy from the merchant Ibrahim who makes forgeries at checkpoint rest town.
When you are done with all that we want you pick up this sack and put it in the yard next to the hay. This will prompt an interaction and you will be dragged into the tavern where you will be able to buy your liquor.
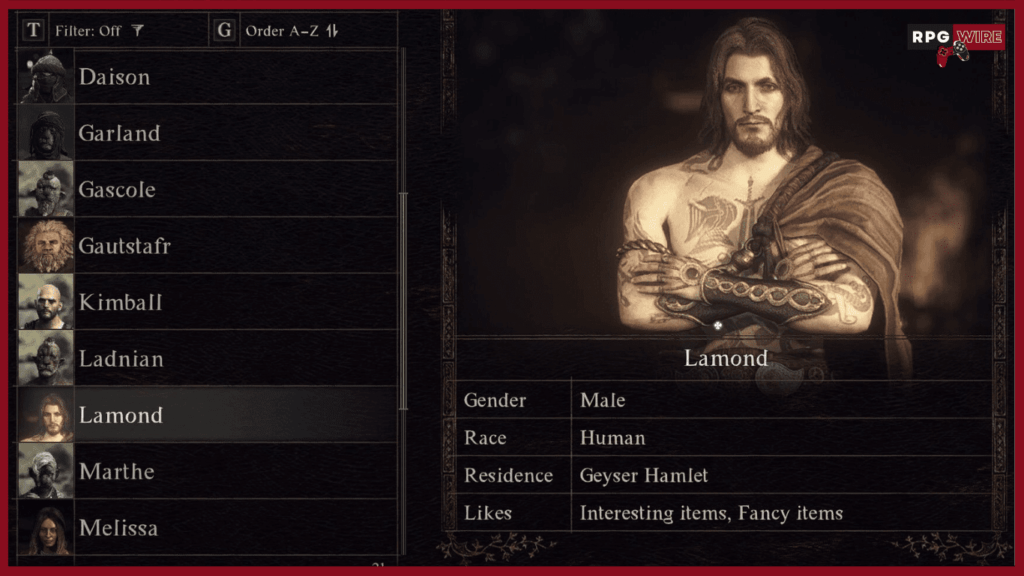
After you finish the prerequisites, make your way to the Hot springs in Volcanic Island Camp (check the Part about Magic Archer for pictures of the locations and how to reach them) and talk to the guy named Lamond sitting and drinking outside of the springs entrance.
Give him the hooch and your vocation will be unlocked.
Now you know what all the vocations are and how to unlock them. Pick your favourite one or try them all out.
That’s it you are done my dudes and dudettes. Hope it’s Friday where you’re at and Game On.
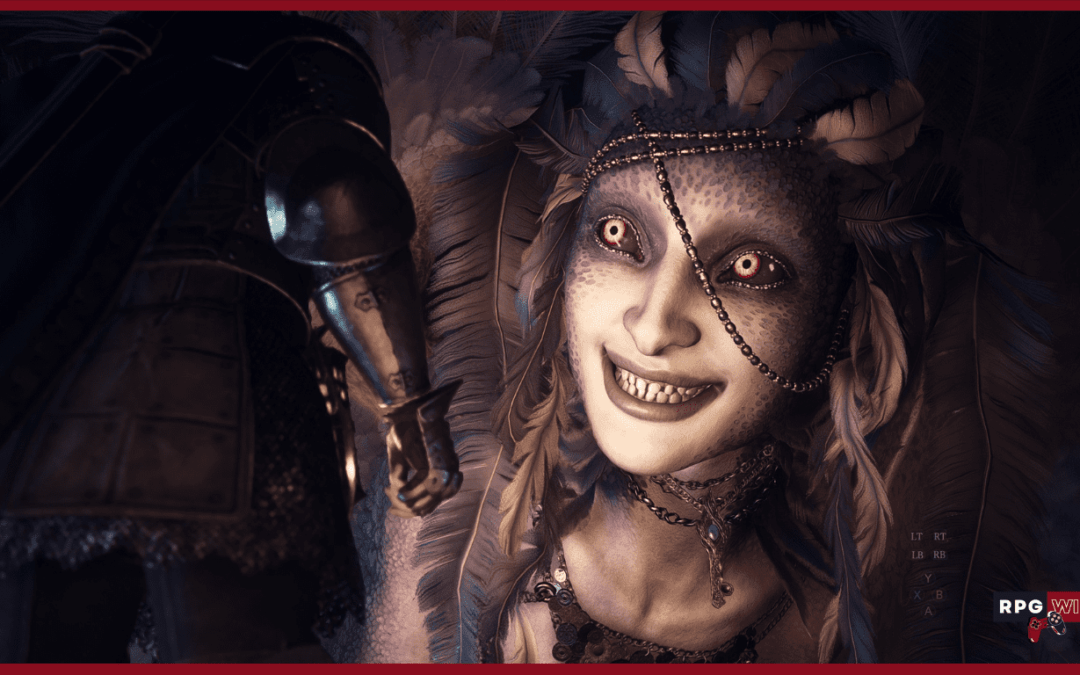
The Sphynx Quest might be one of the coolest story-like side quests in the game according to the consensus of the player base (totally has nothing to do with her Boobas).
You should do the quest for the sake of experiencing it, even if you don’t like riddles. This is where we come in. This guide will show you how to find the creature and how to solve her riddles most efficiently, without backtracking all the time.
Only interested in a specific Riddle? Here are quick links to the main sections:
There is an optimal way to do this but it will require quite an investment of Ferrystones(don’t worry as we will give you an option to do the quest differently with almost no item invested at all).
Not getting the items we suggest will mean a lot of backtracking, so we highly suggest you play the game organically until you reach the second large city of Bakbattahl.
By that point in the game, you should have most of the items from the list.
We will have two sections of the guide under each riddle, the “Optimal” way and the “Normal” way. Depending on how you choose to approach this you can safely ignore the one or the other.
OPTIMAL WAY ITEM PREREQUISITES
NORMAL WAY ITEM PREREQUISITES
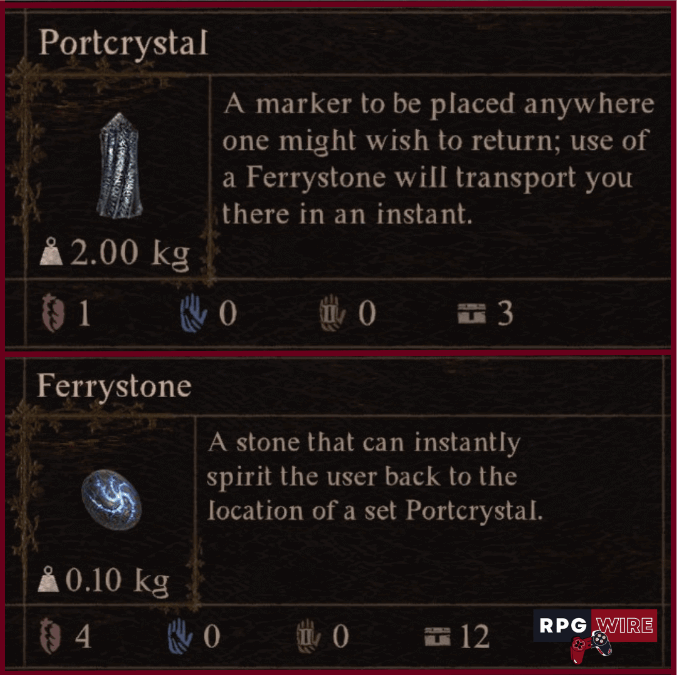
1 Port crystal placed in Bakbattahl
1 Ferrystone
6 Ferrystones
Starting the quest
You will start this adventure from the Checkpoint Rest Town. You get there by walking or getting an Uber from Venworth West Oxcart Station.
Once you reach the town rest at the Inn. This is optional but it will give you an extra Inn save file that you can go back to if something goes wrong.
Take the items from the prerequisite list from your storage and follow the road out of town until you reach this Riftstone of Fellowship.
Go into the rift and hire any pawn named “SphinxMother, SphinxFather, or SphinxParent”.
Make sure the spelling is right.
You will need this pawn to solve a riddle so get it now to spare yourself from backtracking.
Make sure your Main pawn is alive and with you while you are at the Riftstone.
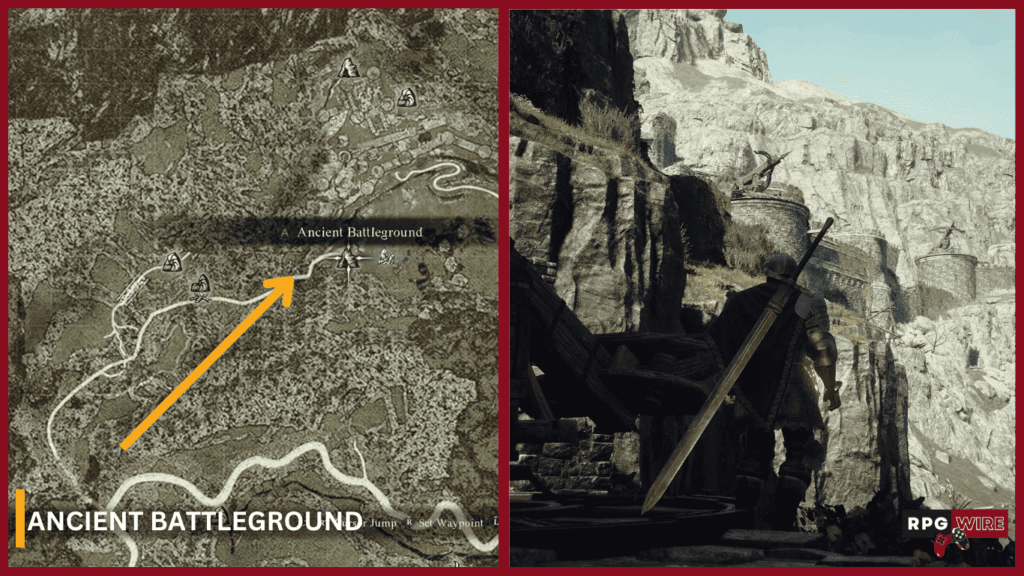
Now it is time to get to the Sphynx first location. Backtrack a little and follow the road north until you reach Ancient Battle Ground.
There will be a Drake fighting Cyclops under the castle but you can safely ignore them and run up to the gates. Go inside take a left and work your way through the castle. You will have to fight some undead until you reach the ladder that will lead you up to the lower level of the battle. When you climb up, walk straight until you reach this hole.
Drop down and fight some more skeletons. On your left, there will be a boarded-up door. Brake it to unlock yourself a shortcut for future travel and then take the other door straight through the castle until you reach the second ladder and climb up to the upper battlement.
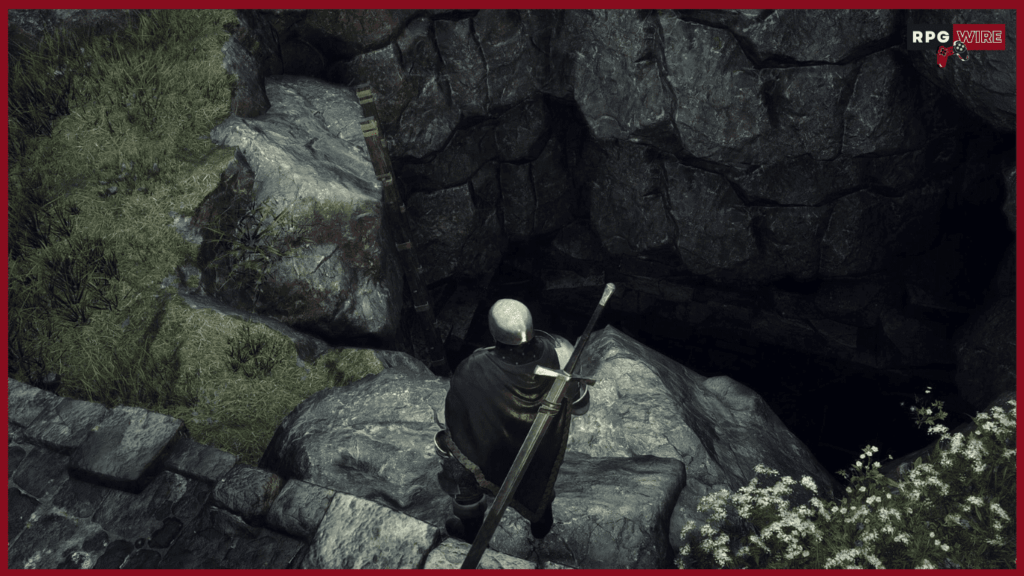
Walk straight and look to your left for this passage, climb up the ladder, and jump down through the gap on the wall where the arrow is pointing to reach the Worldsend Cave.
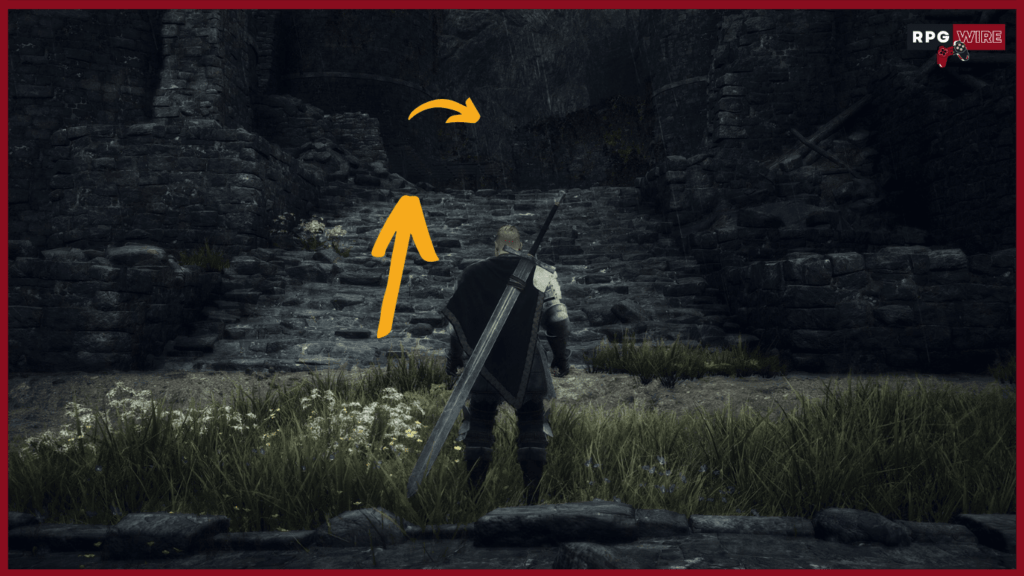
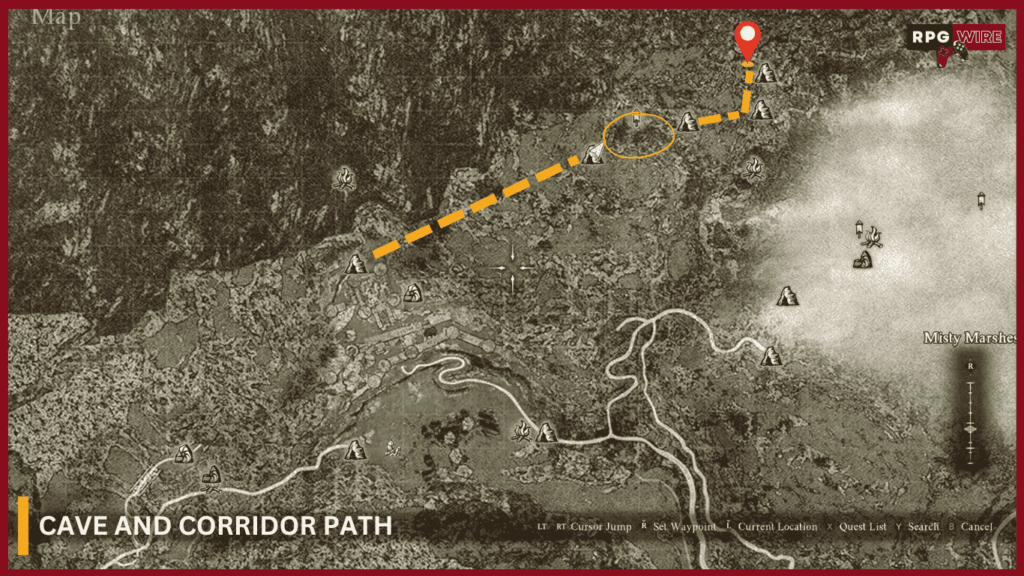
Now all you need to do is follow this route through the Worldsend Cave and a Shrine Corridor with a gap between them that looks like a Golem graveyard.
Well, not really as one of them is gonna come to life and you can fight it or skip the fight and run straight to the Corridor follow the stairs up and you have reached the Mountain Shrine of the Sphinx.
First five riddles
Now let us start solving riddles. You will take the riddles in the same order in this guide if you want to make solving them as smooth as possible.
1. Riddle of Eyes
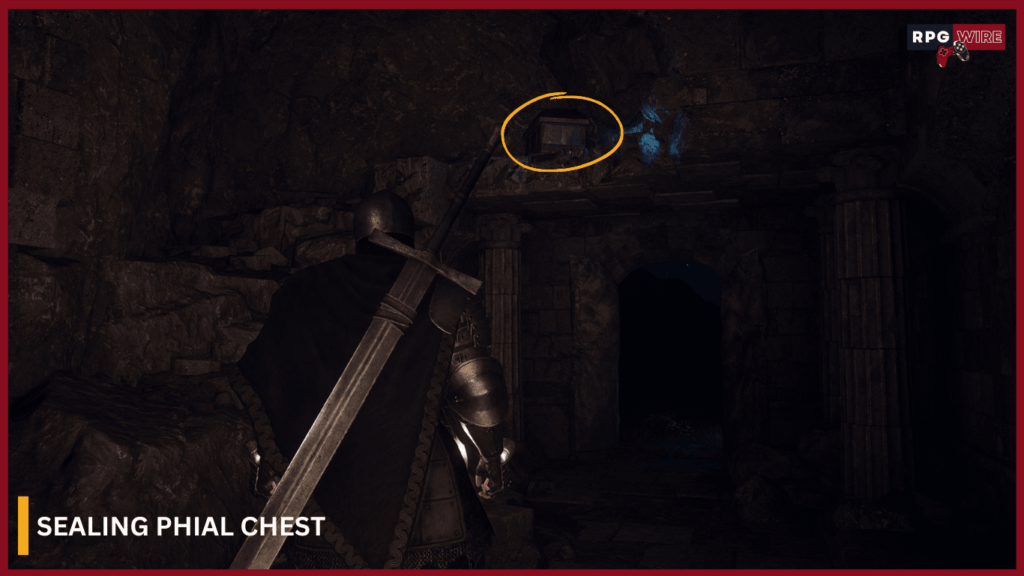
For this riddle, Sphinx will ask you to bring the items of greatest value from the nearby tomb.
Now you can go in and explore the whole tomb but the item you need (Sealing Phial) is in a chest up the slope behind the entrance.
Give the item to the Sphinx. You will keep the Sealing Phial and you will get a Wakestone as a reward from the first chest behind her.
2. Riddle of Madness
In this riddle Sphinx will ask you to bring her a person you care most about.
There are a few ways to solve this but the most efficient one is to grab your main pawn and place her/him on the pedestal in front of Sphinx.
Make sure not to back out of the dialog option once you have your pawn in place.
You will get a Portcrystal. This is going to be important as we are going to use it for the next riddle and further down the line.
3. Riddle of Conviction
The Sphinx will ask you to give you something that is most precious to you. There is no right answer here: you give the Sphinx any item you want. The trick is not only will you get the item back but she will double it as a reward for solving the riddle.
The obvious choice here is giving her the Portcrystal you just got. Not only to make the rest of this quest easier to do but Portcrystal are the most valuable items in the game as they let you set up teleportation points and there are only a few that you can get in a given playthrough.
But if for some reason you like Rotten Apples and you want to double it instead don’t worry you can follow a Normal Way of this guide like we mentioned before.
OPTIMAL WAY: Take one of the Portcrystals you just got and place it around the shrine.
NORMAL WAY: Munch on those Rotten Apples like it’s the last thing you will ever eat.
4. Riddle of Wisdom
In this riddle Sphinx will ask you to bring her parent back to her.
Remember that Rift Stone we sent you to get the pawn named “SphinxMother, SphinxFather, or SphinxParent”. This is the riddle you will need them for so grab them and place them in front of the Sphinx.
Your reward will be 1200 Rift Crystals.
5. Riddle of Rumination
And here comes the worst part about this quest. I bet some donkey of a dev is leling his ass off thinking of all the people trying to solve this and failing.
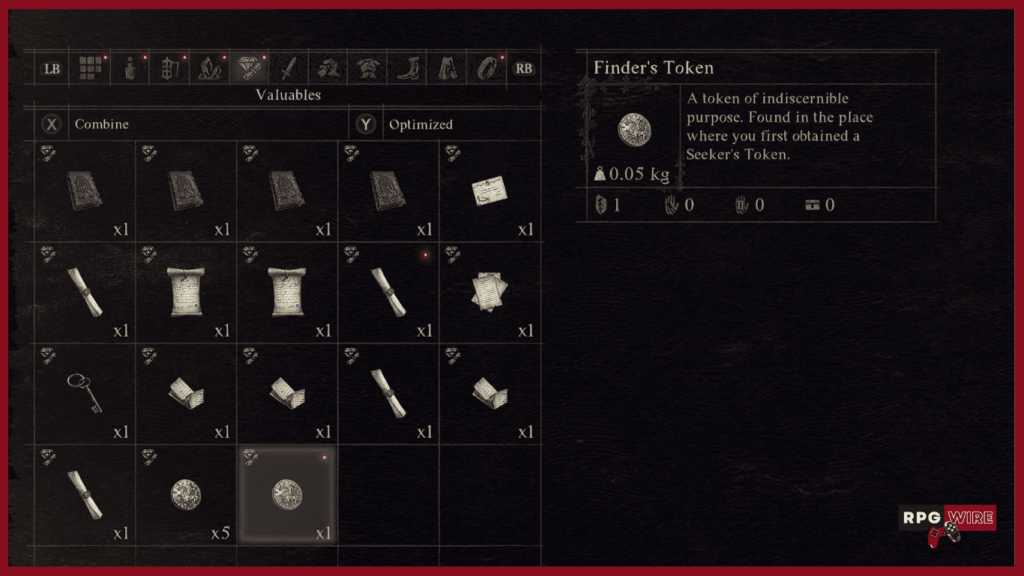
The punch line of the riddle is this: You have to remember where you picked up your first Seeker Token and go there. At the same spot, you find a new special token called Finders Token.
You have only 7 in-game days to solve this.
The reward for completing the riddle is 3 Ferrystones.
If not and you don’t remember we have one other suggestion if you don’t mind installing mods. The mod is safe and tested by yours truly.
Go to this link here Nexus Modand follow the instructions on how to download and install the mod. When you do the only thing this mod will do is give you a marker on the location of the Finders Token.
Otherwise, you can just wait for 7 in-game days to pass and fail this riddle. You can fail one riddle and still continue the questline.
OPTIMAL WAY: this is where you will use your first 2 Ferrystones if you do not want to backtrack a lot or risk having too much time pass. Teleport to the closest location of the Finders Token, grab it and teleport back to the PortCrystal at the Sphinx location.
NORMAL WAY: do the same thing as the guy in an optimal way without teleporting.
Whatever you choose to do DO NOT talk to her yet as you have a choice to make.
Making a choice before moving on
Now when you hand in (or not) your Finders Token the Sphinx will move to a different location, where she will give you her last riddles.
You have 2 options here.
You can hand in the riddle and right away grab onto the Sphinx back and ride along to the next location
Pick up the last Riddle reward for a chest and your Portcrystal (if you were following the optimal way) and make your way to the next location yourself.
OPTIMAL WAY: We suggest you hop on to the Sphinx back and ride along to the next location. You can always teleport back here at any time to get your reward using the Portcrystal you placed on the ground.
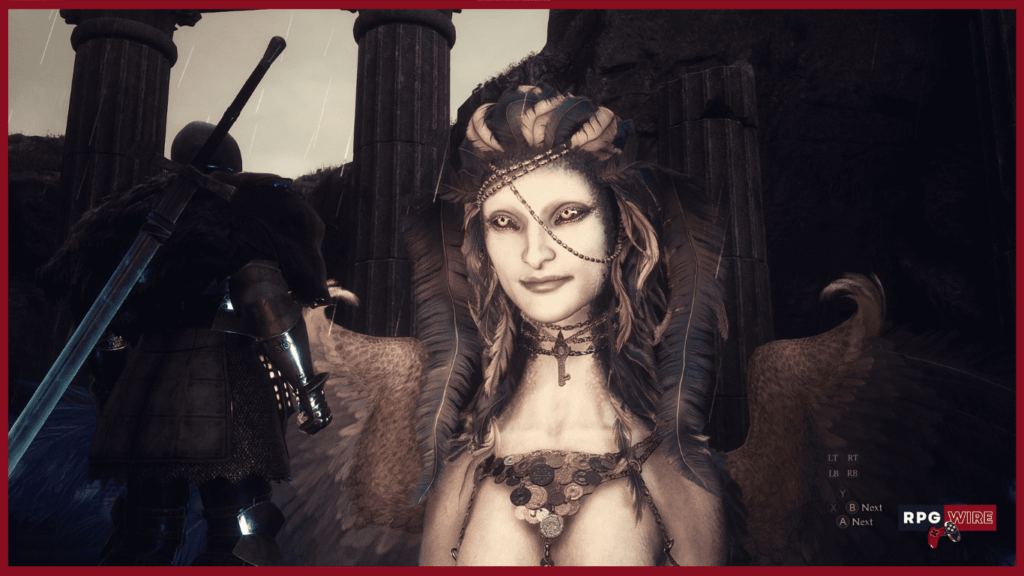
A few notes on how to ride the Sphinx … tehehe (sorry I’m 12 mentally).
As soon as you complete the last riddle immediately jump on the Sphinx and grab onto her.
Don’t hang on her Boobas you horndogs but instead, climb up until you reach her back right in between her wings. Now you can let go so you don’t drain your stamina.
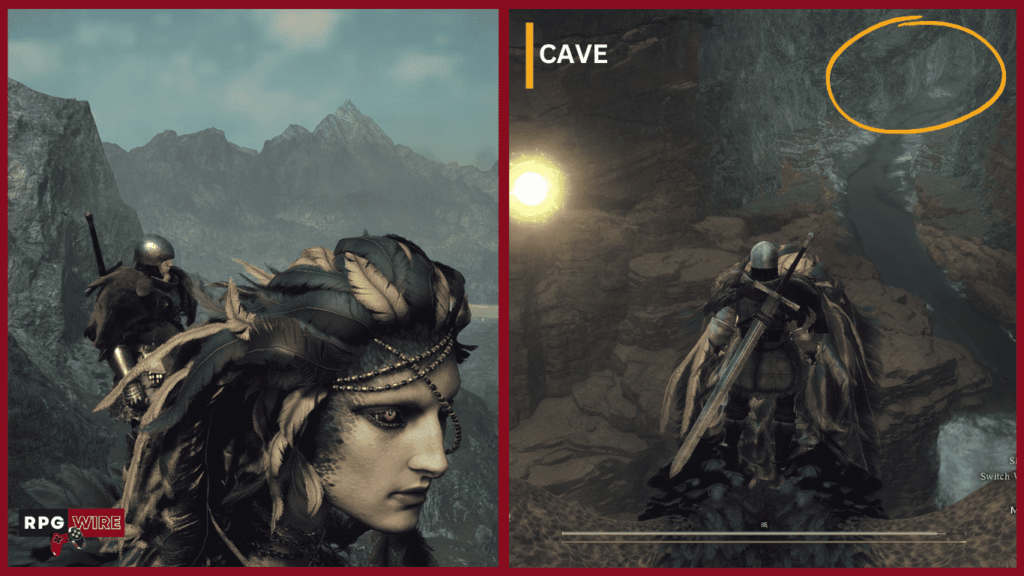
After you pass into Bathhal territory stay vigilant until you see her going for a cave entrance.
This is where you need to grab back onto her otherwise the way she flying will YEET you off her back.
NORMAL WAY: Grab the 3 Ferrystones from the chest and make your way back to the Checkpoint Rest Town. Go to the bridge at the entrance of the town, and go down under it until you see a cave. That is your path forward to the Sphinx’s next location.
Once you get there place a Portcrystal you got from the riddle on the ground.
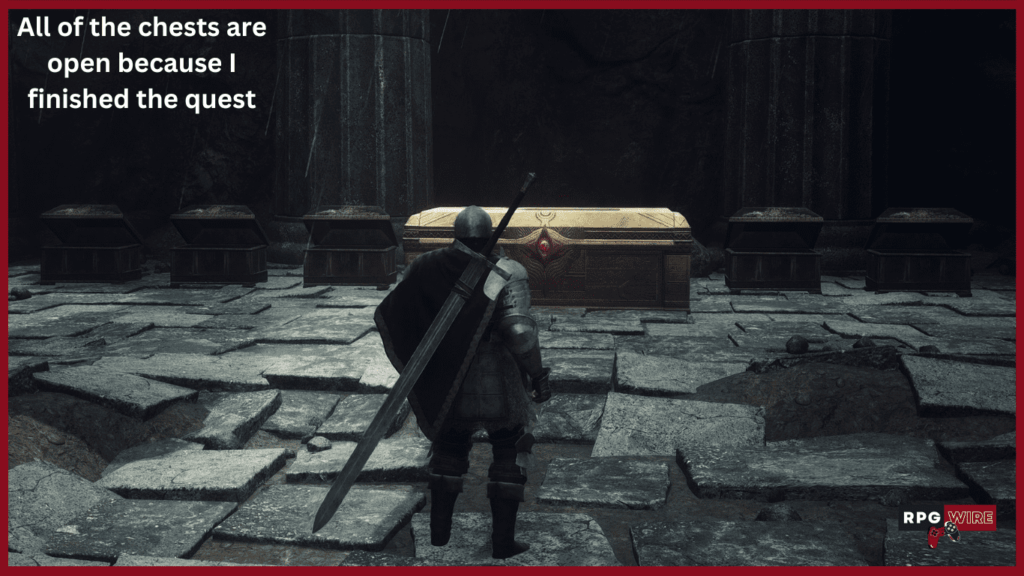
Riddle of Reunion
Whatever path you choose, go behind the Sphinx after she speaks to you and check out the chests.
One of them is open and you can pick up 100k gold.
Why is it open? Finding her counts as solving another riddle and that will be very important to mentally note from now on.
FEW THING TO KNOW BEFORE MOVING ON
From this point on riddles will be given to you in random order.
You must pay attention to what riddle you picked up and find the guide on the following list.
Likewise, we suggest you keep count of how many riddles you solved from now on (if you are unsure we will tell you a trick on how to get the right answer in the next section)
For both the Optimal and Normal way you will place one off the Portcrystal on the ground so you can teleport back to this location.
You will have to read how to solve all of the riddles below so you know what to do before receiving the riddle from the Sphinx.
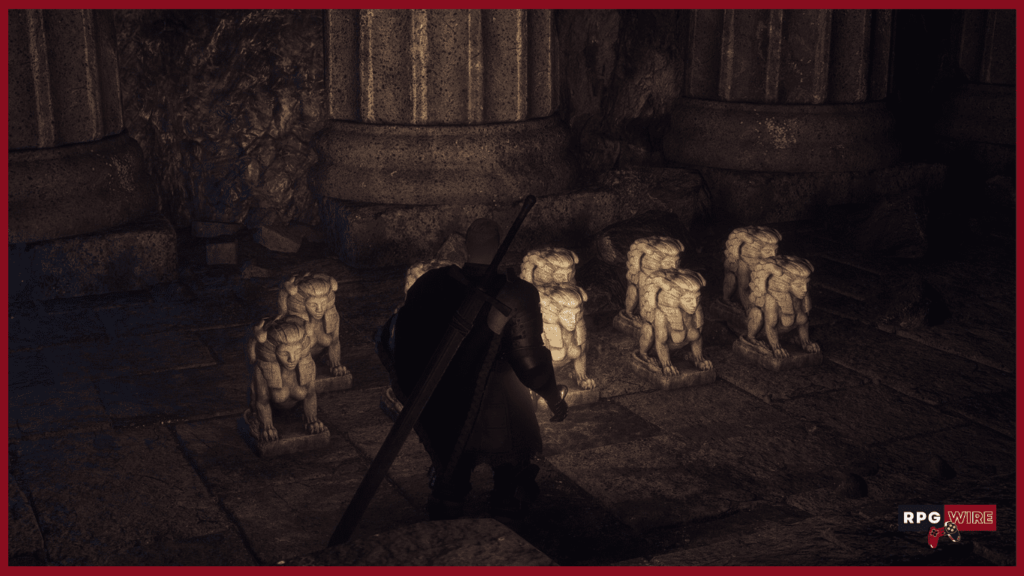
Riddle of Recollection
In this riddle Sphinx will ask you to tell her how many riddles you solved so far.
Now since this riddle can drop on you randomly the number will differ for each player.
Let us say for example you got it right away, as the first riddle in the new location and you solved all the previous riddles without failing a single one.
That will mean 5 Riddles+ Riddle of Reunion (finding the Sphinx new location) and your answer should be 6.
If you got completely lost at some point that is ok we have a trick that you can use to solve this …. Go behind her and count the open chest, then go back to the previous location and do the same if you don’t remember if you failed one or not. Whatever the number is that is your answer.
Now that you have your answer grab the little Sphinx statues and place the correct number in front of Sphinx (they don’t have to be directly on the pedestal, placing them in front of her is enough).
The reward for completing this riddle will be an Unmaking arrow that will kill anything in one hit. Make sure to save it as we are going to use it at the end of this quest if you want to follow the Optimal Way. If you will use the Arrow to kill the Sphinx and this is your final riddle you must be ready to attack her right away after you are done conversing with her.
Hit her until she initiates the dialog “Well you are a persistent one” and her HP bar shows up.
Then sprint to get the Unmaking arrow out of the chest and follow the steps in the last section below.
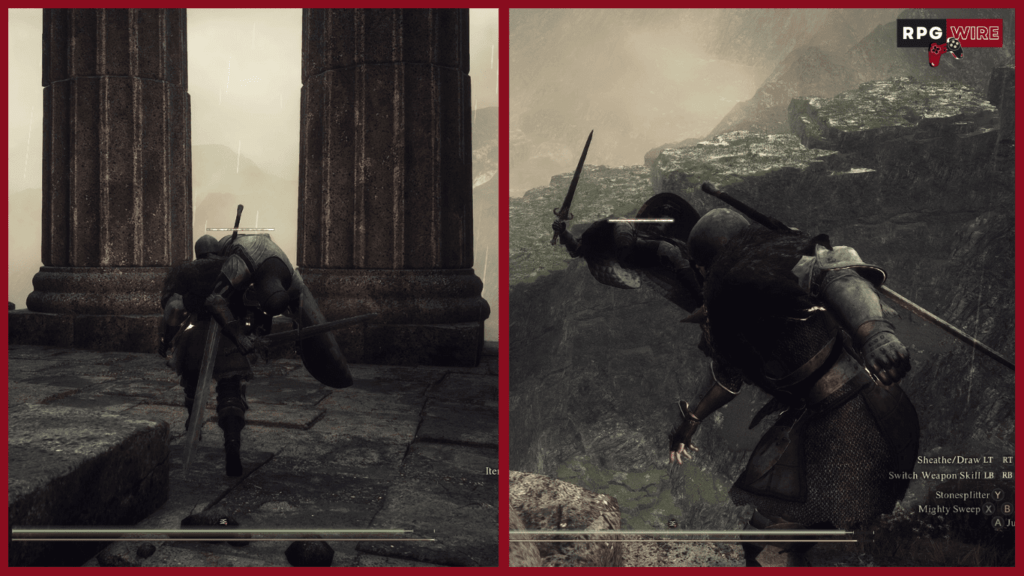
Riddle of Contest
In this riddle Sphinx will have you duel one of her Knights. Ofc it’s going to be a different kind of duel because a normal duel would be too easy.
Before the duel, she will automatically equip you with a Ring of Derision. This ring will make your attack basically do 0 dmg.
Before we get to how to solve this take a mental note not to fight the guy around Sphinx.
If you hit her by accident she will get mad and fly off and that will be the end.
You can go about this in 2 ways.
You can hit the guy with any attack that will break his poise, then pick him up and YEET him off the nearby cliff (easier to do with some Vocations).
Drag the fight to where your pawns are standing and let them take care of him.
That is another riddle in your pocket and your reward will be a Ring of Ambition that boosts XP gains by 50%.
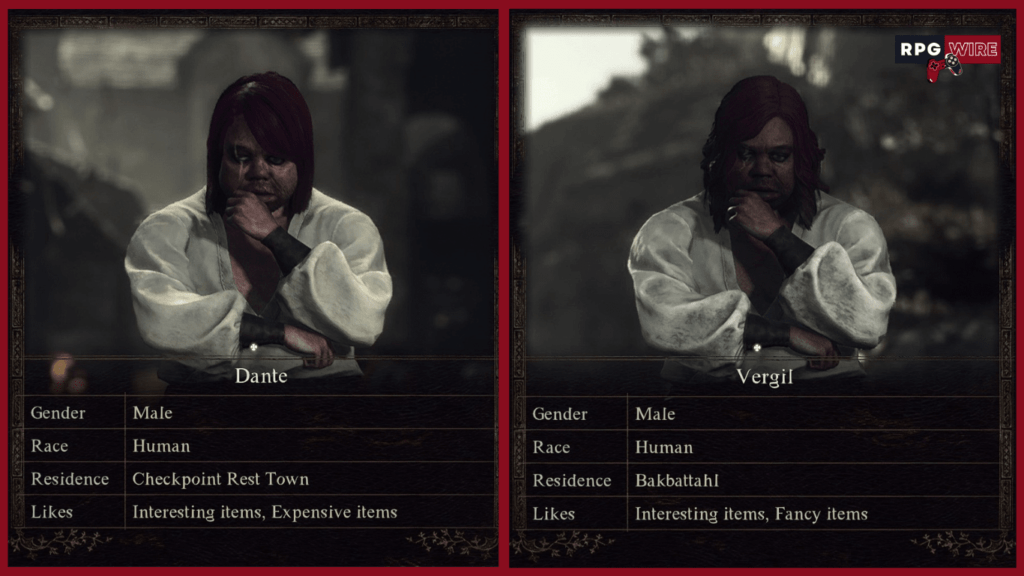
Riddle of Differentiation
In this riddle Sphinx will ask you to bring a specific person to her.
She will show you a “holographic illusion” of this individual.
We suggest you take a screenshot of him as soon as she shows you the guy (if you missed it you can ask her to repeat the riddle and do it then).
Otherwise, you must pay attention to the scar over his eye or hair. Why? Because she is sneaky bish and is asking you to bring her one of two twins.
Dante or Virgil (a little Devil May Cry easter egg).
The only two differences between them are the scar over their eyes and their hair.
Dante has straight hair and a straight scar over his eye. You can find him roaming around shops in Checkpoint Rest town.
Vergil has wavy hair and a wavy scar over his eye. You can find him roaming around the main road past the South border checkpoint.
OPTIMAL WAY: this is where you will use 2 Ferrystones. Teleport to Bakbattahl or Vernworth and go to a Vocation guild. Change your Vocation to an Archer or a Warfarer. Grab a bow from your storage or buy one in the shop(we are doing this for the last phase of the quest so you don’t have to backtrack).
Now take an Oxcart to Checkpoint Rest Town or the South Border Checkpoint. Find your target (Dante or Vergil) and grab them. Once they are over your shoulder use Ferrystone to teleport back to the Sphinx and place them on the pedestal and talk to her.
NORMAL WAY: Stroll your way to Checkpoint Rest Town or the South Border Checkpoint. Find your target (Dante or Vergil) and grab them.
Now you will have 3 choices:
Take a painful stroll back to the Sphinx while dragging your target with you.
Use one of the Ferrystones that you got if you completed the Riddle of Rumination to teleport back to the Sphinx with your target over your shoulder.
Use the Sealing Phile to trap your target inside it and return to the Sphinx(note that this is a one-use item).
Place your target on the pedestal and talk to the Sphinx to complete the riddle.
Riddle of Futility
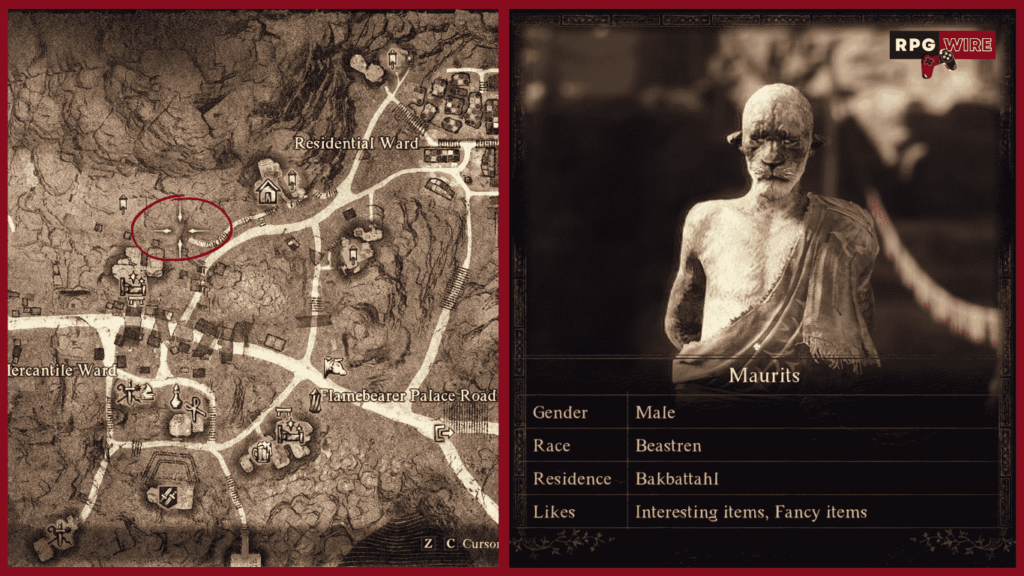
In this riddle, Sphinx will ask you to bring Amphora to the Ser Maurits in Bakbattahl.
This thing is so fragile if a wind blows on it it will break so we won’t bring the Amphora to the person we will bring the person to Amohora.
OPTIMAL WAY: this is where you will use 2 Ferrystones. Teleport to Bakbattahl and go to a Vocation guild. Change your Vocation to an Archer or a Warfarer. Grab a bow from your storage or buy one in the shop(we are doing this for the last phase of the quest so you don’t have to backtrack).
Now go to the location marked on the map pick up Ser Maurits and fling him over your shoulder. Back up a bit till you have a clear view of the sky and use a Ferrystone to teleport back to the Sphinx. Drop him next to Amphora to complete the riddle.
NORMAL WAY: Stroll your way to Bakbattahl.
Now go to the location marked on the map, pick up Ser Mauritis and fling him over your shoulder. Back up a bit till you have a clear view of the sky.
This is where you will use 1 Ferrystone from the prerequisites to teleport back to the Sphinx. Drop him next to Amphora to complete the riddle.
Final Riddle-Sphinx Fight
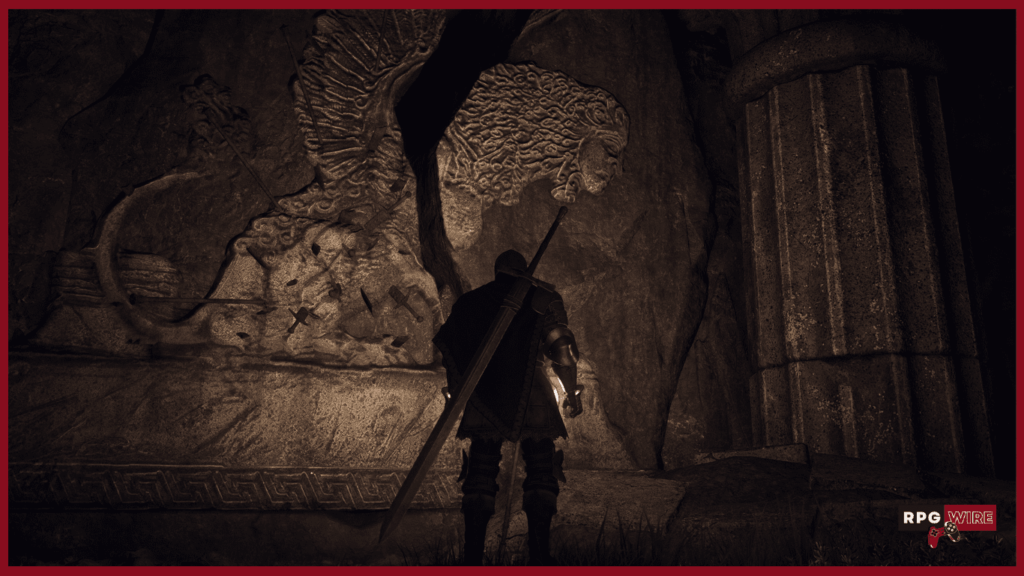
All along the way there are clues about the final Riddle depicted on many murals you passed and even on the Amphora you delivered to Ser Mauritis. You also might have or might not noticed that she has a shiny golden key around her neck that opens that shiny golden chest behind her.
The trick to fighting her is to Hit her in the butt and back legs while not touching her face and front part provided you want to do this without using the Unmaking Arrow.
Long story short as soon as you finish the final riddle make sure to attack the Sphinx right away to initiate combat. You will know you did it if she initiates a conversation with you and her HP bar appears.
OPTIMAL WAY: You should be in your archer or wayfarer vocation by now. Equip the Unmaking Arrow and shoot her. Make sure your aim is true because the game saves after you fire the arrow so if you miss… well you missed.
NORMAL WAY: Before handing in the last riddle dismiss all of your pawns. Take your Main Pawn and YEET her/him off the cliff and leave them to die.
We are doing this because pawns won’t aim only for Sphinx’s legs or ass and can and will do enough damage to fail the fight.
Make sure you only hit the Sphinx over her rear end until she dies.
After you are done with the fight Mommy will tell you how proud she is and will drop the Key of Mendacity. Take the key to the golden chest and loot the Etharnal Wakestone as your reward.
This item can be used to mass revive people in a location if something bad happens like your pawn losing his mind because of a STD.
That’s it you are done my dudes and dudettes. Hope it’s Friday where you’re at. Game on.
My dudes and dudettes and all of you others who want some spoiler-free Dragon’s Dogma 2 tips and tricks you’ve come to the right place.
We will give you some basic advice about how multiple systems work in the games and try to prevent you from committing grave mistakes that will possibly put your save file in the garbage forcing you to start a new game.
So without further ado let’s drop them, shall we?
1. Use both game saving mechanics
Let’s start with a simple one that will spare you a lot of grief. Some people have had their entire run bricked because auto-save threw them into a situation where they died over and again without any way to get out.
Here is how it works, you have one save file. This is done to avoid save scumming and makes your decisions permanent. This is something that we like and agree with. The game will save under this file every time it auto-saves or you save manually.
However, there is another separate save file that you can use as a backup if something gets bricked, and that is an Inn save. It’s simple, every time you sleep in an Inn it will create an Inn save that will not get overridden by your autosave.
So make sure you do it often, Arisen, as a backup point that you can come back to if something goes wrong. We recommend you use it often, you never know what might happen.
2. Learn how fast travel works
We will start here as this game does not have a traditional fast-travel system. It is a game about exploring and walking around and we are all for it. Think more like Red Dead 2 and less like Skyrim.
Here are a few ways you can fast travel in this game:
Fast travel using an oxcart
Same as carts in Skyrim you can rent them for a cheap sum. After you are done paying the good Uber man, you can sit down and chill. Take in the sites on the way to your new destination or you can skip the ride by dozing off.
But beware! You can be intercepted by different types of monsters and if the fight centers around the cart too much it can get destroyed, leaving you at best stuck halfway to your destination.
Fast travel with portcrystals or ferrystones
Now this is an actual teleportation system.
Portcrystals are like a focus point you can teleport to. Some locations like towns have their own but most don’t, and you need to place them down manually. They can be placed anywhere on the map but are the rarest item in the game and you won’t get more than 2-3 in your entire playthrough.
Ferrystones are the items you use to teleport to Portcrystals. Also quite rare and expensive they are simple to use once you obtain one. Find a spot outside where you can see the sky and use one from your inventory. The map will pop up with all the Portcrystals on the map.
Simply choose one and shazam, you are there in a pop.
All of your pawns and NPCs that you are escorting will come with you, and on a fun note, you can even kidnap others by grabbing them and using a Farrystone while they are still flung over your shoulder. What are pawns you ask? Well, that brings us to the next section.
3. Make full use of your pawns
Pawns are your trusty companions. They will follow you on your adventure, help you out, and fight alongside you. You can have a maximum of 4 in your party.
There are 2 types of pawns: your main pawn, and other players’ pawns.
You will create your main pawn quite early in the story and you can customize whatever you want, from their appearance to their gear, vocations, specialization, and so on. Gear is self-explanatory.
Vocations are classes that we will go over in the next section and specializations are skills that your pawns can learn from a scroll that can be found in the world. For more info about specializations follow our site. For now, just make sure you equip one of them to make your pawn more appealing to hire.
You can set up your pawn’s quest and quest rewards. It’s quite simple, you set up a quest like kill Cyclops or get my pawn a certain item I need that I don’t want to farm. If another player completes it, they get the reward you set up for them, being either gold or items.
Other player pawns are equipped and customized by their master and can be hired by you in the Riftstone. If they are the same level as you it will cost you nothing to hire them otherwise you will have to pay a sum of Rift Crystals currency which is a separate currency from normal gold.
You can’t change a hired pawn’s appearance but you can change their gear. Beware, however, as all of the gear you equip them with will be gifted to their master once you dismiss them from your party.
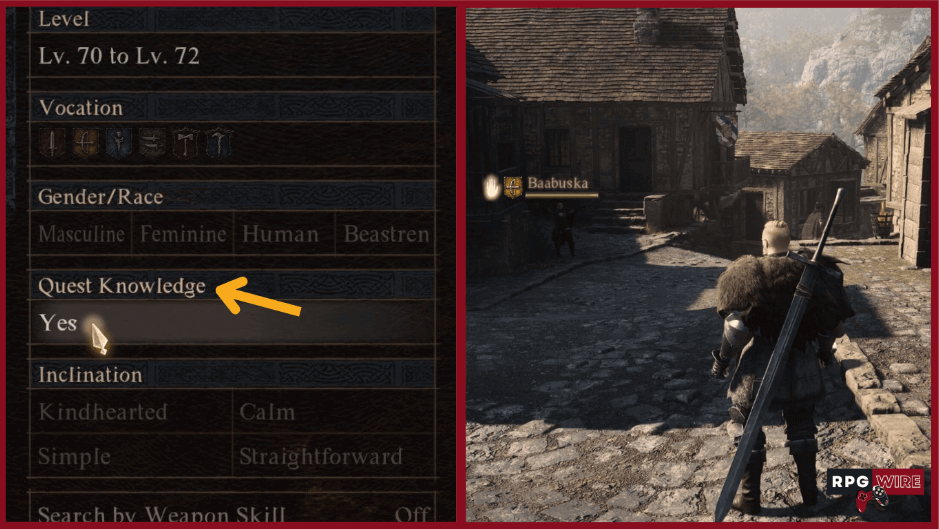
A final tip about pawns that can help you out immensely is going under the advanced section in the Rift and clicking the option to show you the pawns that know about the quest that you are currently on. If you get stuck on the quest and don’t know where to go they can guide you to your next destination.
4. Don’t be afraid to experiment with different vocations
Vocations are classes in the Dragon Dogma 2 universe. You start with four basic ones: Fighter, Thief, Archer, and Mage. You will choose one of them for yourself and your Pawn in your character creator screen.
If you are worried too much about your choice don’t be, you are not locked into it and can swap vocations freely for both yourself and your pawn in some Inn-s or vocation guilds.
You can unlock 6 more vocations in the world and as arisen you can use all 10 of them while your pawn can only use 6. For the sake of keeping this article spoiler-free we won’t talk about the other 6 vocations but if you want to know about them check our our dedicated guide to Dragon’s Dogma 2 vocations.
Except for mage that is essential in all the parties (unless you want to spend an ungodly amount of consumable healing items), make sure you have a good balance of vocations in your playthrough. Archer to deal with flying targets and keep poking at the weak spots from afar, a Fighter to stay close and personal, taking the hits, and a Thief to climb on monsters and poke their eyes out with his daggers.
That is if you want to have a tool for every time of enemy and situation out there.
However, if you want to make things difficult for yourself you can always take your main pawn only and give him only support spells, while you deal with challenges around you.
5. Take your time with quests
Dragon’s Dogma 2 doesn’t really handhold as far as questing goes. The game leans more towards the Elden Ring method than something like Skyrim. There are no quest markers over NPC-s heads. For many quests there will be no markers on your minimap unless the quest giver specifically does it for you.
While this might seem annoying at first, we feel like the “Ubisoft” method where you are being told where to go and who to talk to by 17 map markers is getting stale and frankly was not too much fun to begin with.
This doesn’t mean you need to pick a random location and hope you will finish the quest. There are plenty of tools to help you and they are done in a really fun and immersive way.
Here are a few:
Pay attention to the world around you. Most NPC-s with quests will have a dialog that will suggest they need help. Many will stop you in your tracks if you pass close to them and they need your help. There will also be a lot of gossip happening around town that will point you in the right direction of a quest giver. Keep your eyes and ears open, Arisen.
Visit the Oracle. There is an NPC that is marked on your map as the Oracle. This psychic individual can help you with the next step of the quest with a little note containing useful tips…for a small fee ofc, nobody works for free.
Use pawns who have completed the quest. We mentioned this before in our pawns section. You go into the Rift and under advanced search, you find a pawn with the quest knowledge. It’s almost like having a cheat code since the pawn will guide you to the next stage of your quest. Cool system.
6. Nebulous Dragon’s Dogma 2 tips
Why do you ask? I told you I would avoid spoilers. Just read the list and do it. Don’t ask too many questions. You’ll thank me later.
Take a picture of the map location when you pick up your first Seeker’s Token.
Seeker’s Tokens are collectibles found around the world. You pick them up, take them to the vocations NPC, and you can unlock some cool rewards with it. Why do you need to take a pic of the location of the first one you pick up? Who knows, it’s quite a “riddle” right?
Examine your pawns.
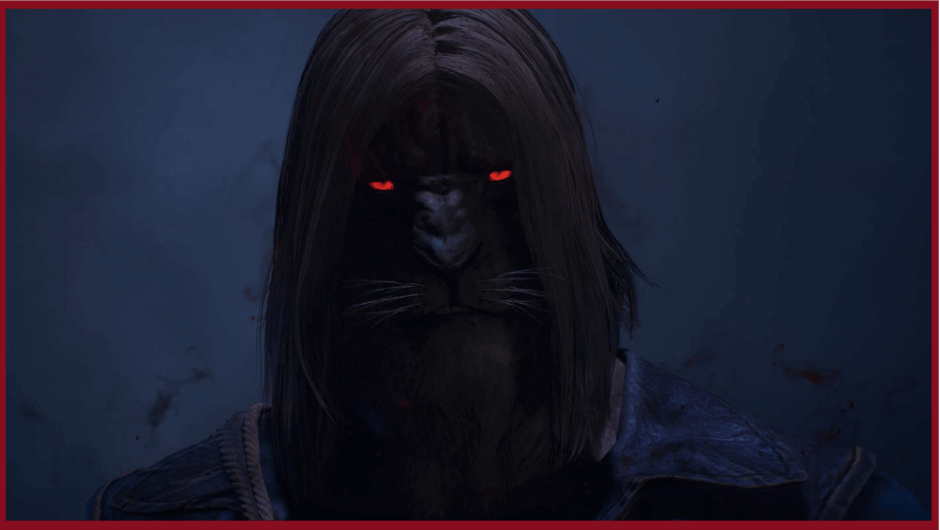
What do I mean by that? If you want absolutely zero spoilers I suggest you stop reading now and skip to the next tip. However, given how punishing this mechanic is, I think you should stay. You will find out about this in your first few hours of gameplay as your pawns will talk about it. I dismissed it as bullshit or a random dialog. Big mistake.
Your pawns (or the loyal servants to the arisen, your main character) can contract a dragon plaque disease. Symptoms include things like not obeying commands, sassing you but most importantly and easy to spot, pulsing glowing red eyes.
Every time you are about to hire one check their eyes and if they have an STD, DO NOT take them with you no matter how hot or scantily clothed they are!
Why? Oh quite simple, after you sleep in an INN they will go batshit crazy, laugh like a serial killer then turn into a shadow dragon and kill everyone in the city you just rested in.
Yes, that includes the quest-givers, vendors, and all other important NPCs. This is not Skyrim my dudes, there is no such thing as an immortal NPC. There is a way to get them all back to life but it requires doing one other quest perfectly and it takes hours of work so we suggest you avoid triggering it in the first place.
So what do we do if the pawn is disobedient, wipes his forehead, holds his head like he has an elevated temperature, and has pulsing red eyes? That’s right. We don’t hire the fucker. Or we send him back home to his master so he can spread his STD there.
If this happens to your main pawn, well, one nice throw into the river and waiting until he drowns should cure them right up.
Wrapping up
This wraps up our Dragon’s Dogma 2 tips & tricks guide. We hope they will save you from becoming a dragon’s chew toy… or contracting an STD. Keep your wits about you and your journey through the game should be a smooth one. Happy adventuring in Dragon’s Dogma 2.
Today we’ll take a closer look at the best BG3 mods, at least in my opinion. For most RPG lovers, this game needs no introduction. But, if you’ve been hiding in a cave for the last few months, sobbing and pleading to the heavens for an amazing new game, Larian Studios has you covered.
For those of you, like me, who already have a few BG3 playthroughs under their belt, picture this: the ability to enhance everything from armor, classes, and character appearance.
♻️ Since I first published this guide, I’ve done three more playthroughs and tested hundreds of mods. I’ve now split the article into several sections by category. The mods in this list are the essentials I recommend for any playthrough (especially the dad bod one!). If you’re looking for something specific, just use the quick links below.
Well, the modders, as usual, have created all of this, and more. Here are a few of the best Baldur’s Gate 3 mods that we used in our playthroughs. They’re gonna put a new coat of paint on the game and make your next run more fun.
How to install BG3 mods
Guys, a word of caution before we get started. You are downloading third-party software, so you should somewhat know what you’re doing.
While we never had problems, at worst you might download malware. At best you will break your game and have to reinstall it again. The responsibility rests entirely with you, should you choose to do this.
Thankfully modding Baldur’s Gate 3 should be pretty straightforward. Usually, it involves downloading the mod as a zip from the page using this launcher to install it. Then, you simply export the list into the game.
⚠️ You should always, and I mean always, read the instructions on the front page of a mod. The best BG3 mods have extensive instructions on how to get them up and running. Information in this article can and will get outdated.
Weapon and armor BG3 mods
Picking out the perfect outfit for adventuring through the Underdark or attending a high-stakes Githyanki soirée? Look no further. These BG3 mods ensure your warrior will turn heads, whether you’re angling for a compliment from your companions or just want to look sharp for that special someone in your party.
Remember, in Baldur’s Gate 3, fashion could very well be your deadliest weapon. Forget about practicality; who cares if that new armor set offers little protection? Your real goal is to win the heart of your latest romance option, or at least make them think twice about that snide comment they were going to make.
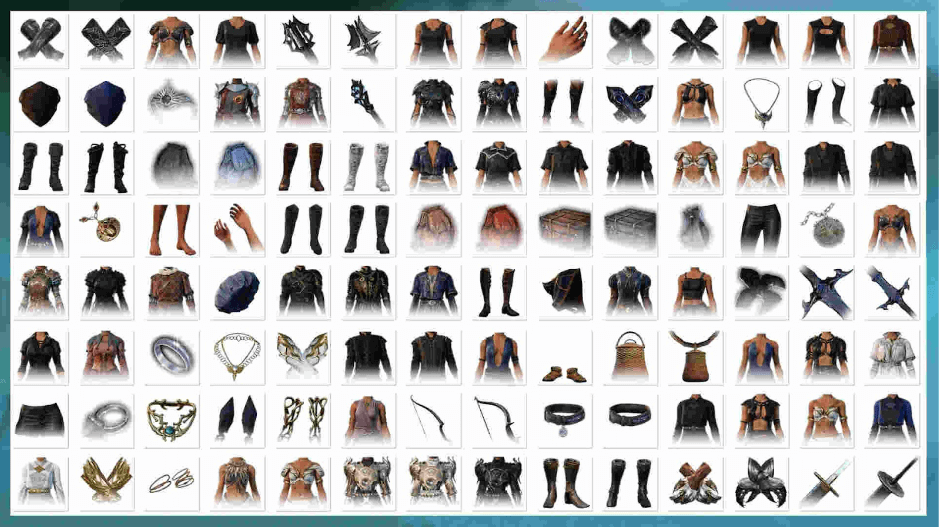
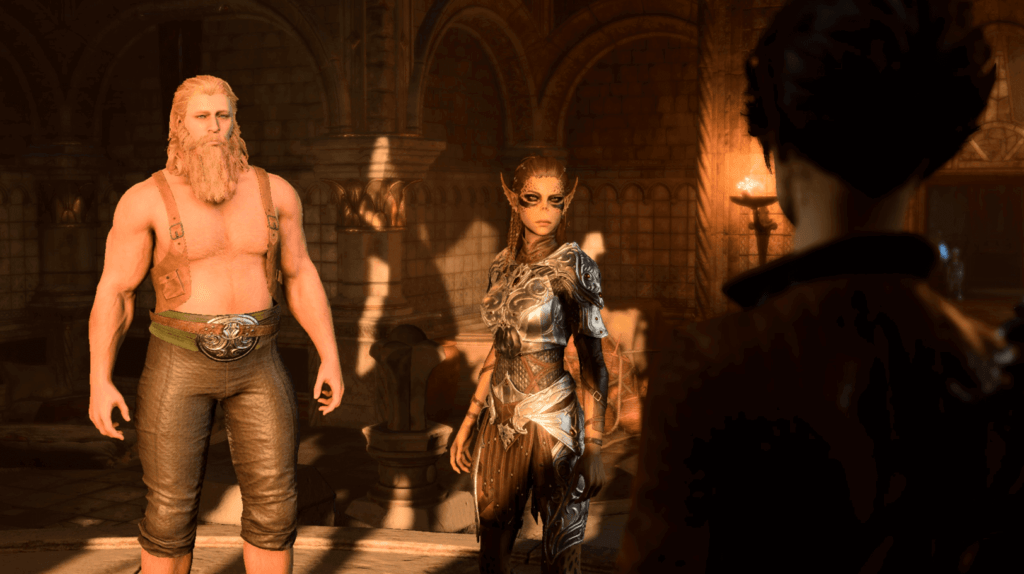
This Bahamut of a mod adds around 400 new armor pieces with female characters winning in the amount they can use… sorry boyz and gurls. There are also a few weapons and a nice necklace that let you summon the containers, with all the stuff added by a mod with a nice simple spell that you can use anytime, anywhere.
This mod is a must-have and no wonder it’s one the most downloaded out of all the categories of best BG3 mods.
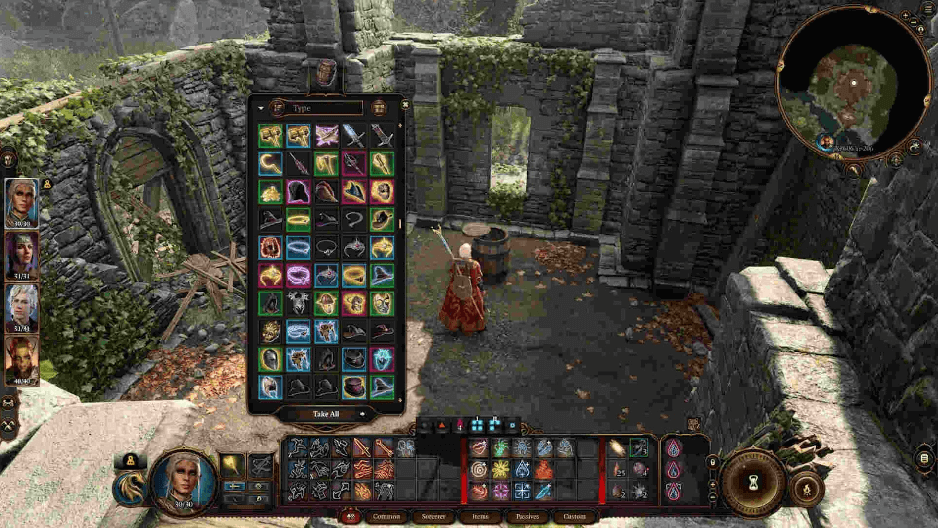
Have you ever had that one amazing item that drops in Act 3 at the end? You only get a few hours with it, and it makes you a sad cat. With this mod, when you hit the wilderness camp for the first time, you’ll find a box with 90% of the game’s items. This means you can be a happy cat from the beginning.
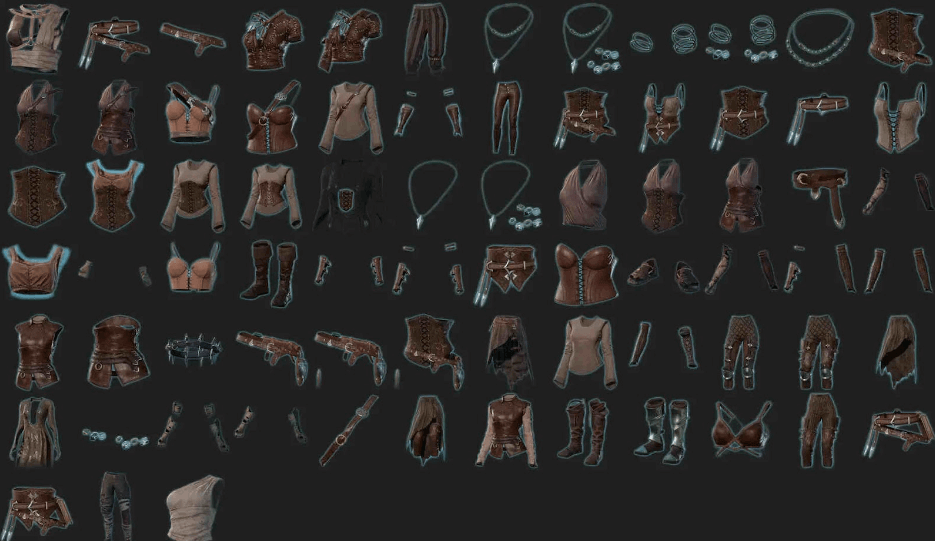
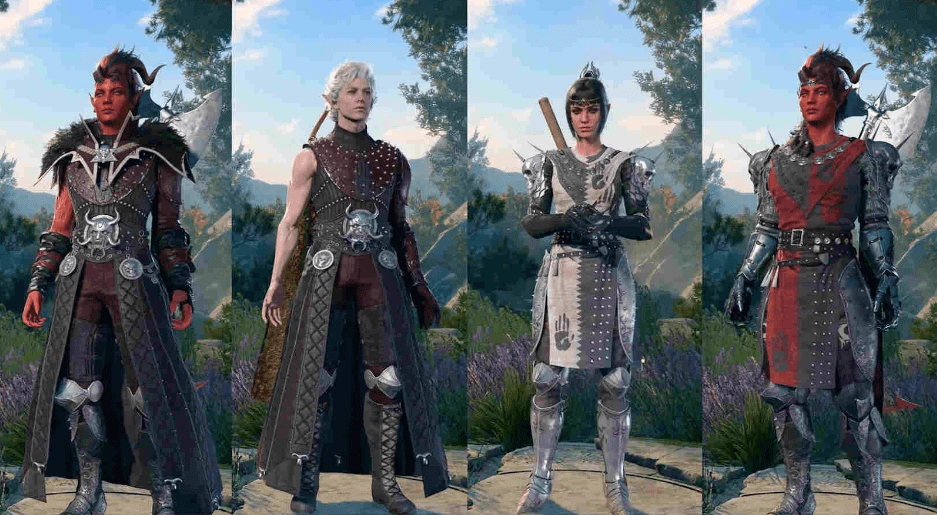
This mod is a combination of a few armor sets in the game made into completely new awesome-looking armor sets. It’s amazing how this BG3 mod author blended these pieces. They look like they were shipped by the game developers themselves.
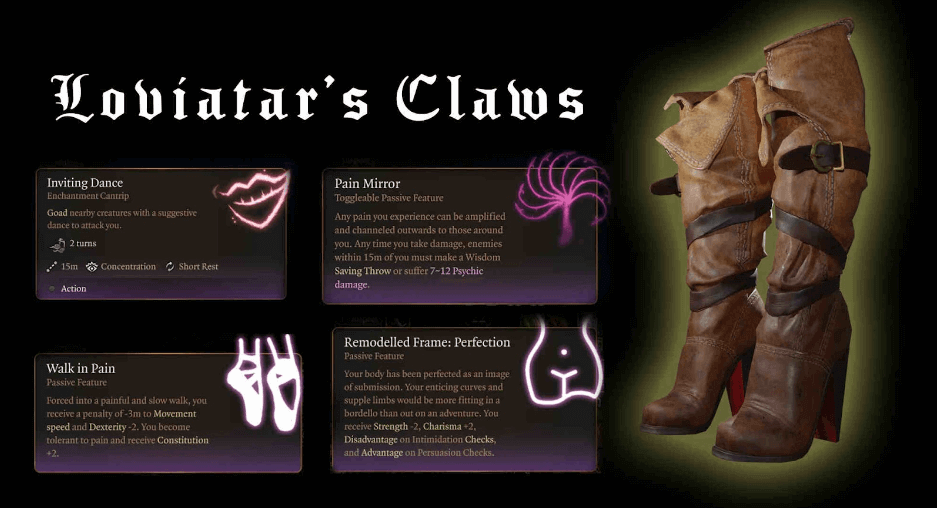
The mod author “dicombobulateddisc” has produced a couple of Baldur’s Gate 3 mods. Hi-heels is one of them. They might not be lore friendly. However, this is some high-quality work. After checking the one we picked, you should click on his page and see if there is anything else you like.
Character customization BG3 mods
Ever look at your character and think, “If only I could tweak that nose, or maybe add a scar here to tell a story?” Well, buckle up, buttercup, because the customization train is leaving the station, and you’re on it.
With these BG3 mods, you’re not just playing Baldur’s Gate 3; you’re directing your own fantasy epic, and able to fully transpose yourself into the game if you so wish. Because who doesn’t want to be a straight white human male in a world full of tieflings? Whether you’re into subtle changes or complete overhauls, prepare to meet your dream avatar.
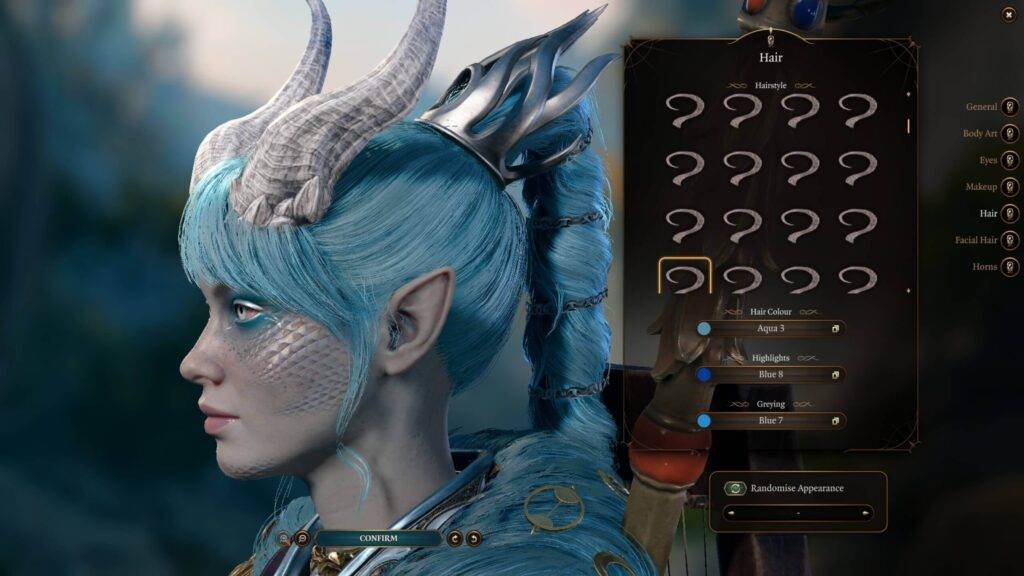
Do you like the hair options in this game ? How about adding around 50 new ones for both males and female characters? People this mod is on the front page for a reason, get it now, you won’t be sorry.
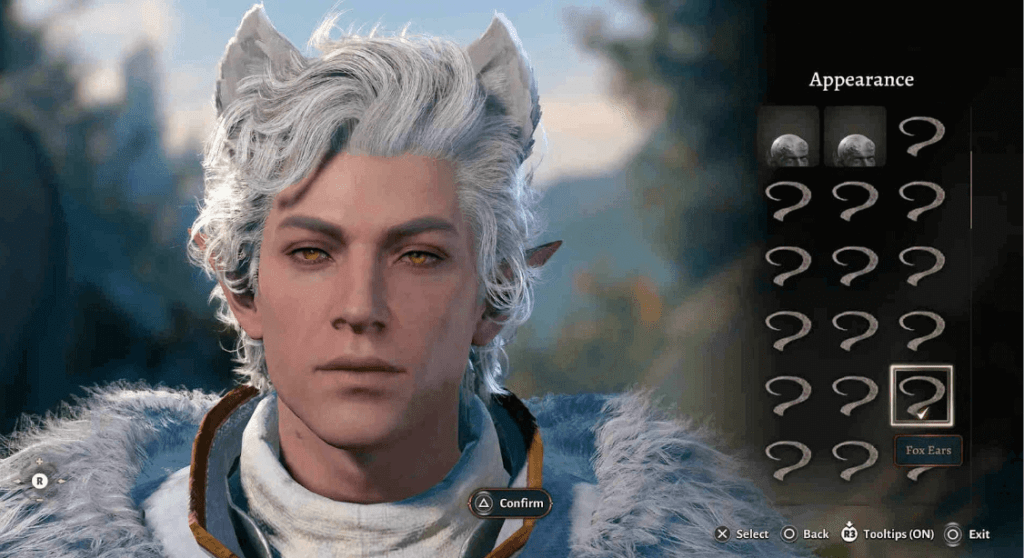
Caption: This character was made by one of our writers with the New Character Creation Presets mod
The only thing I found lacking in Baldur’s Gate 3 character creation was the face options.There are only a few of them and you can’t customize them at all to your liking.This mod fixes that. It brings a SHIT-TON (yes, that is a number, and you can’t convince me otherwise) of new faces for both male and female characters.
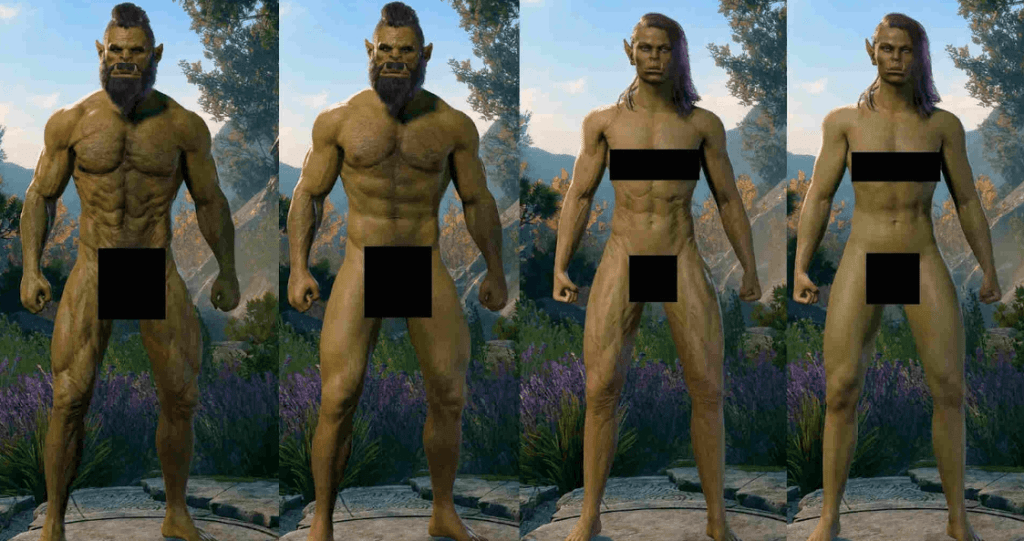
Ever wanted to play an orc and not look like a shriveled ball sack when you take off your clothes? This mod has you covered. Simple one for all of you Axe-Wielding Barbarians.
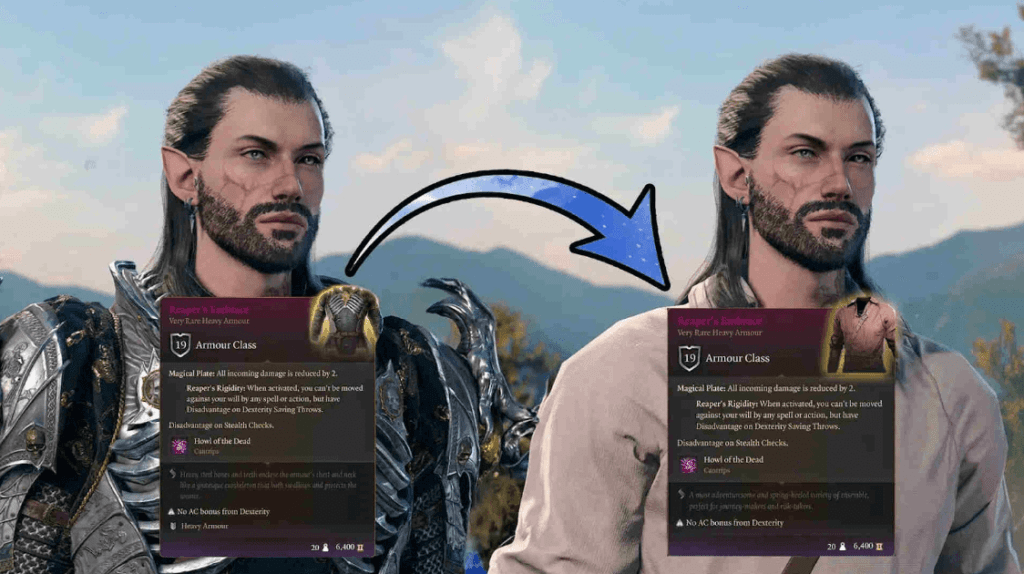
Baldur’s Gate 3 has one cardinal sin: the lack of “transmog”. It’s the big flaw that keeps it at a score of 10 out of 10 instead of 11 out of 10. For those who never played WoW, transmog is the ability to change the look of your gear into another piece of gear, without losing the item stats. This mod has you covered.
No more looking like a clown just so you can be as powerful as possible.
Larian listened to the feedback. They heard that we want to change our character’s appearance in-game. This mod will just enhance that.Now, when you look at the magic mirror, you will be able to change your body type and race. You can even edit origin characters to some extent.
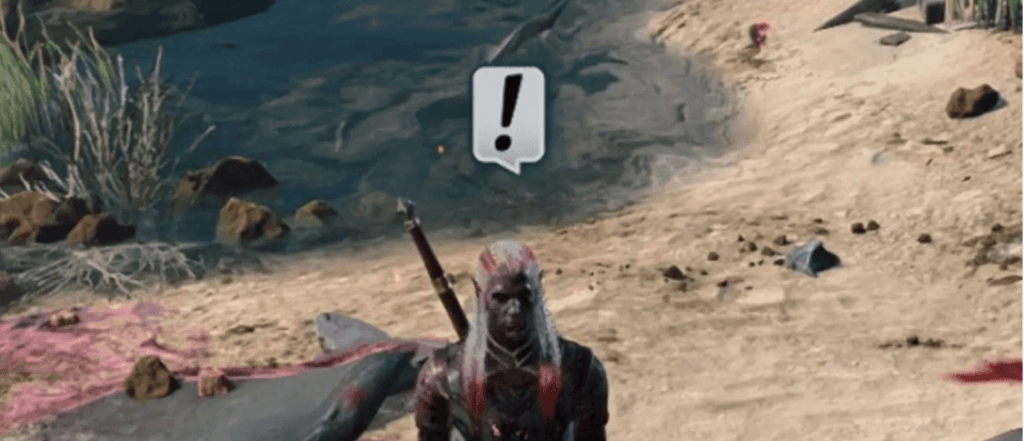
If you don’t rest enough, you might miss some camp events. There’s a point in the game where some events stop showing up.
This mod will put a floating exclamation mark above your main character’s head. It will do this when you have camp events pending. You will never miss another one ever again.
Do I need to explain more? Tired of clicking the mouse to move? This mod lets you use your directional keys to move your character. It also includes improved mouselook and the ability to toggle between jogging and walking. Simple and effective.
This mod expands on camera limits so you can look at this beautiful game from a whole different angle.
Some features in this mod include: override zoom limits, override camera FOV, camera speed modifiers, and much more.
If you want to expand what you can do with the camera in this game this mod is a must.
Wrapping up
So, there we have it, folks— the best BG3 mods (at least according to us) that are sure to spice up your next playthrough. From turning your warrior into a walking fashion statement to reimagining the very essence of your characters, these mods are your tickets to a personalized adventure across the Forgotten Realms.
Have we missed any mods? What are the best Baldur’s Gate 3 mods according to you?
Also, if you haven’t found what you’re looking for, check out our other BG3 mods:
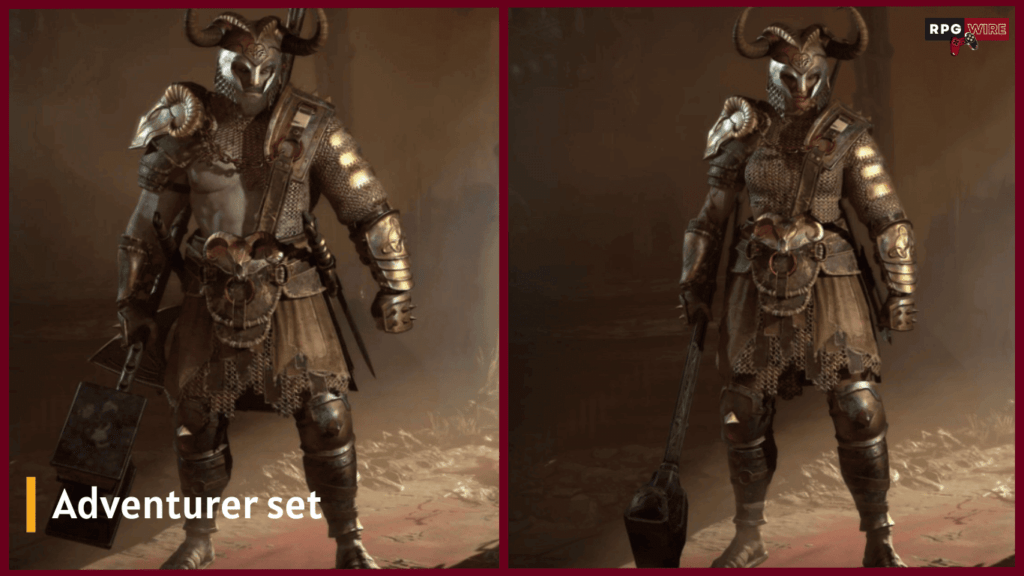
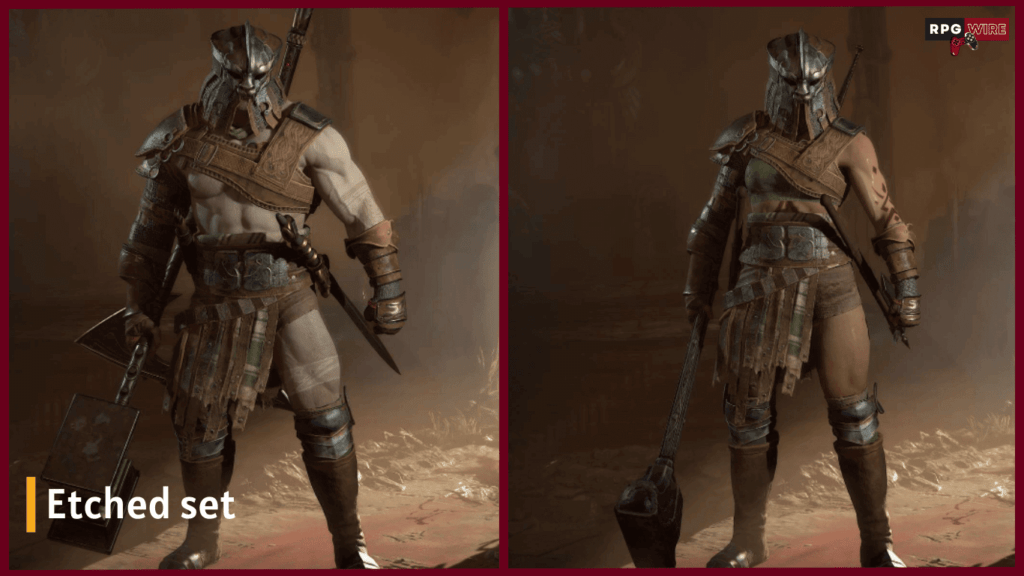
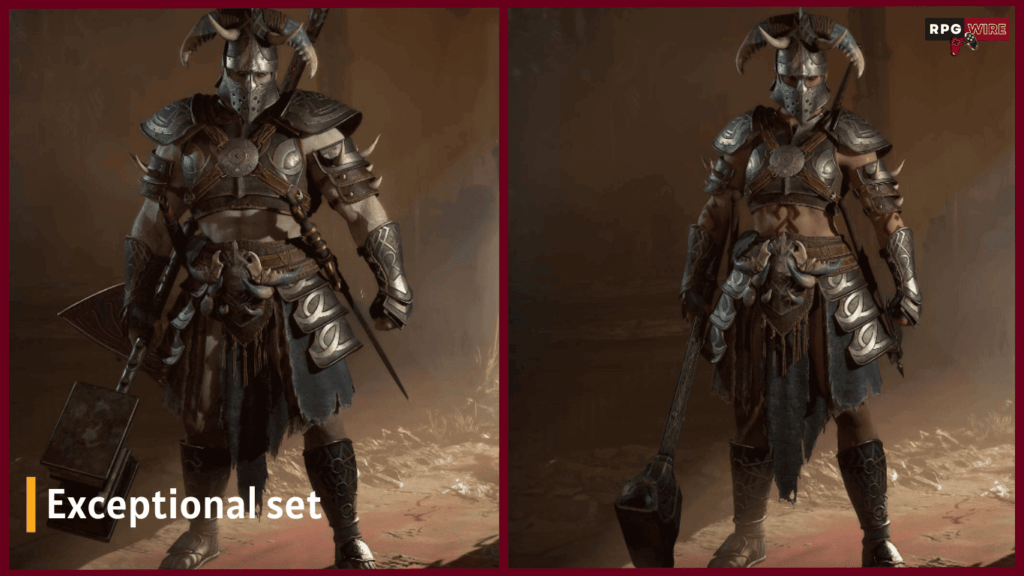
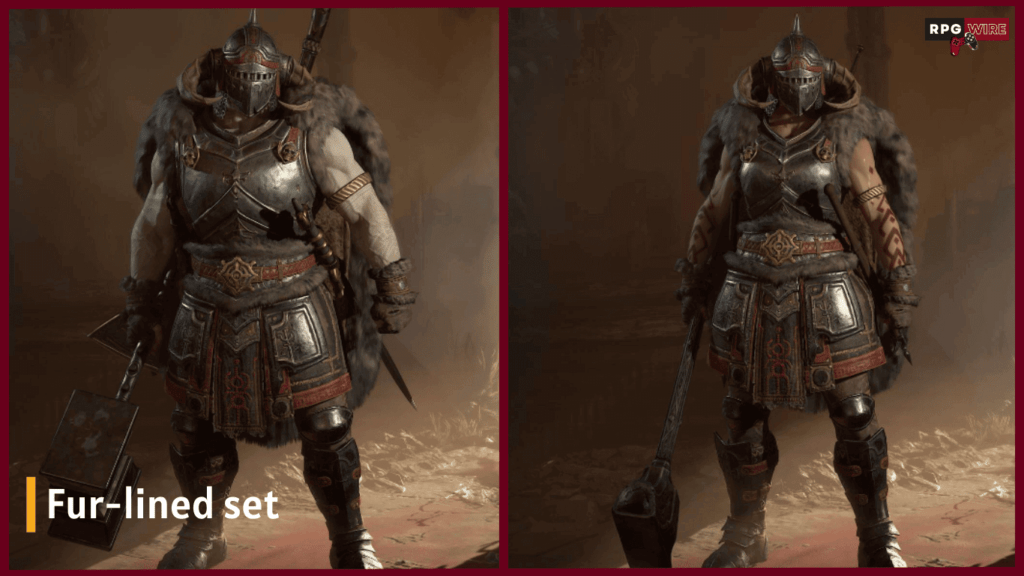
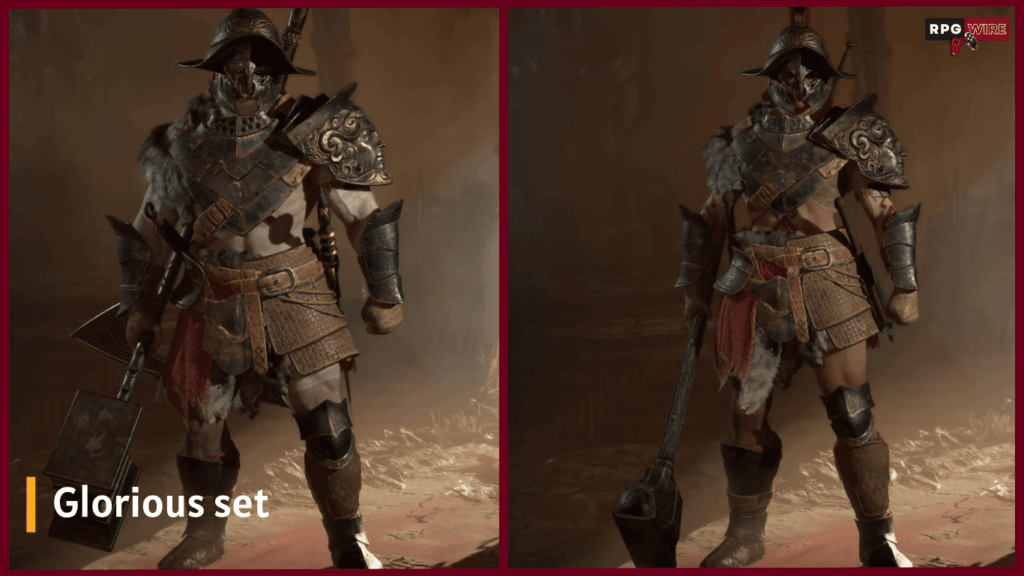
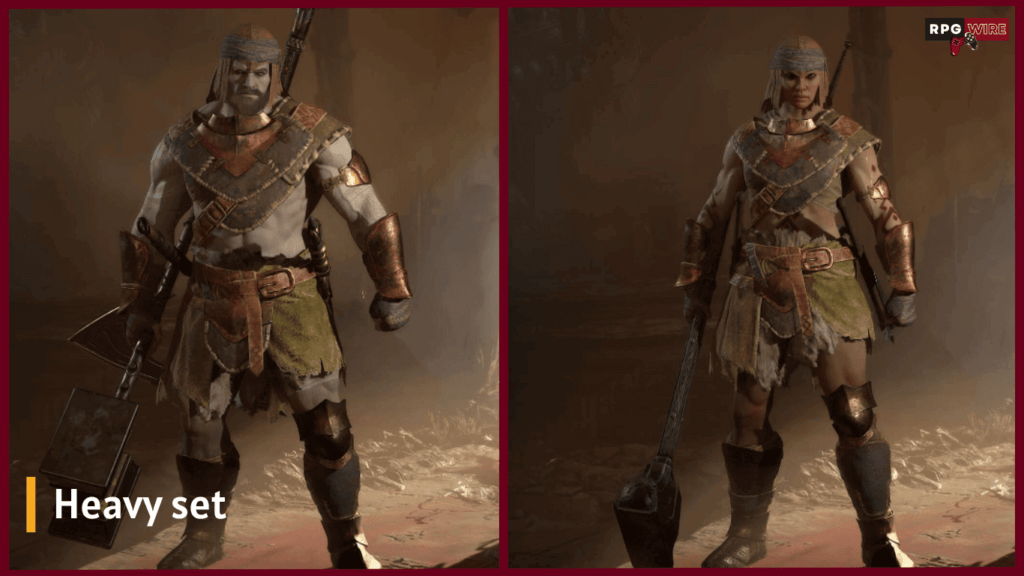
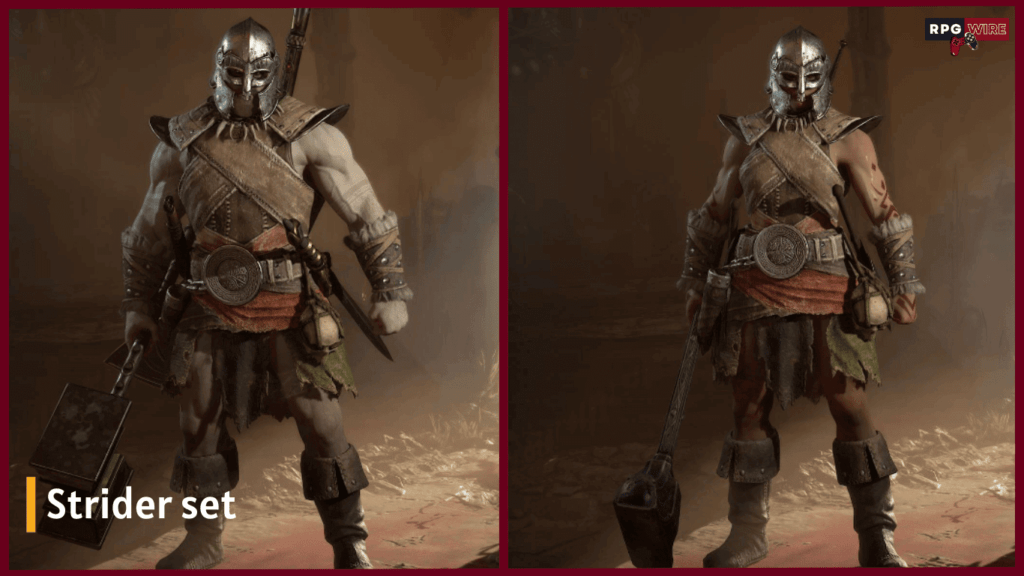
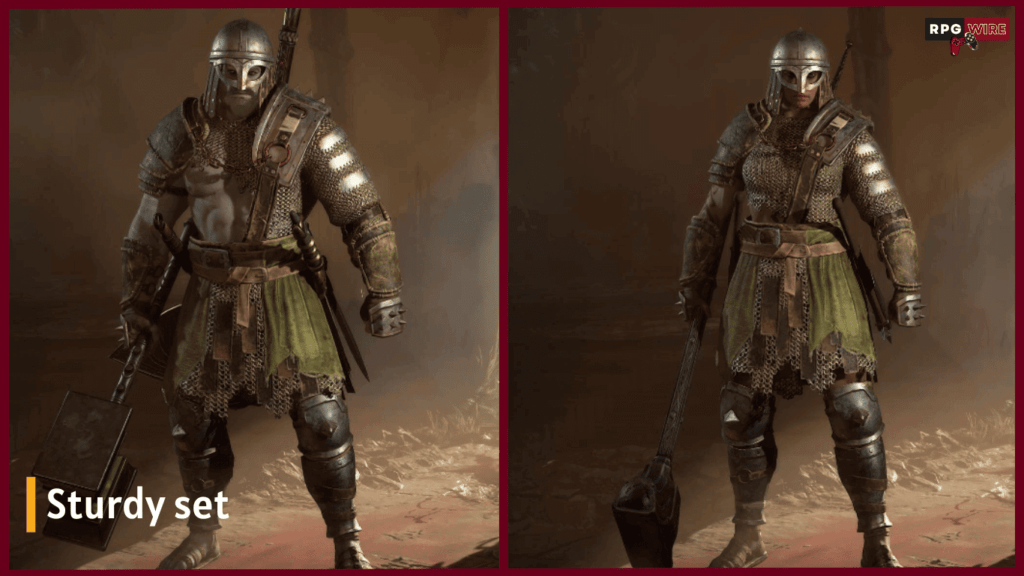
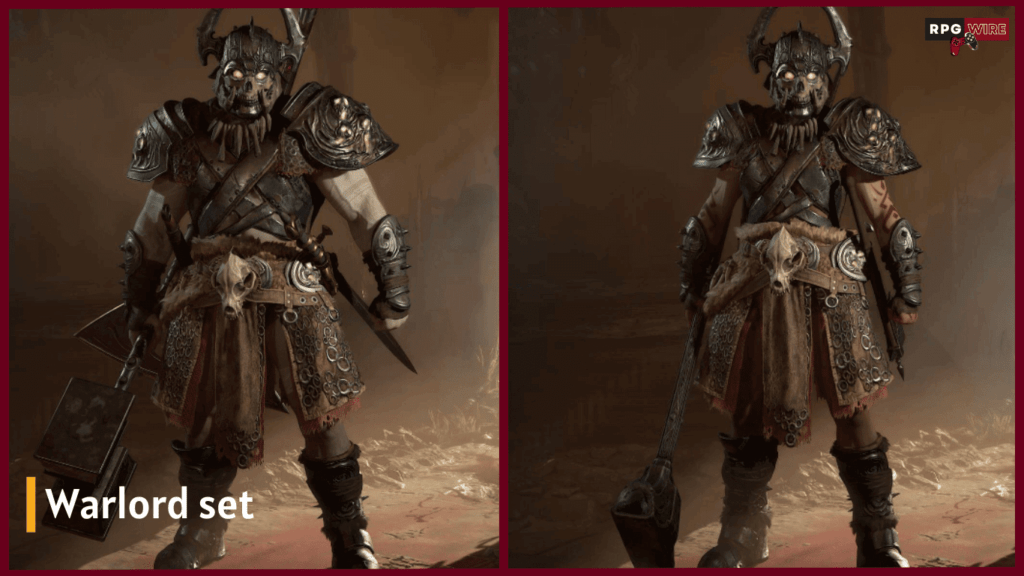
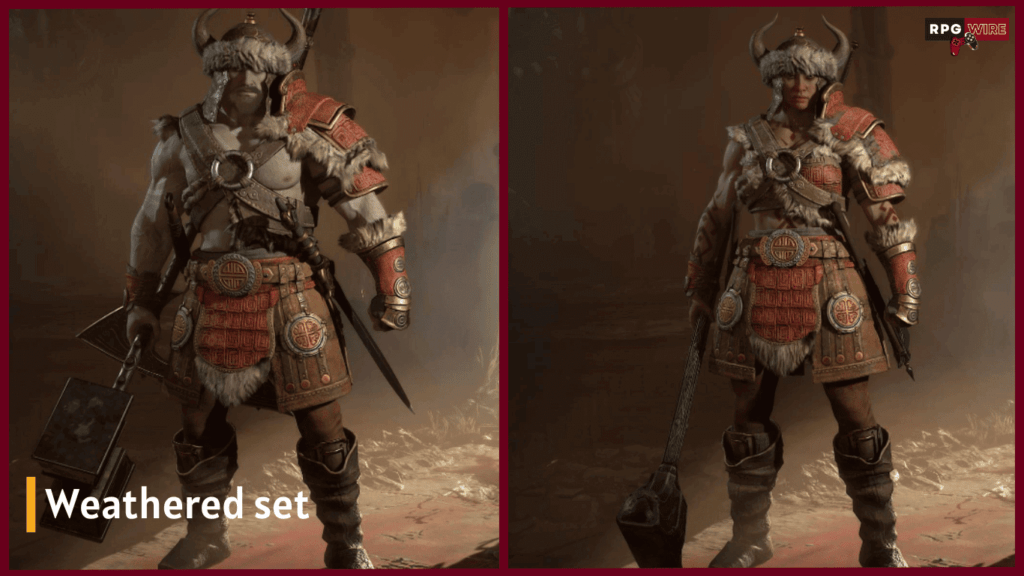
Let’s cut to the chase. You’re here to check out some Diablo 4 barbarian armor sets, and I’m not about to stand in your way with unnecessary fanfare. Picture this: armor so cool, it says, “I’m here to look good and maybe, just maybe, smash a few skulls along the way.” But let’s clear something up—these fancy threads won’t beef up your stats. They’re all about style.
As you wander the Sanctuary, these sets will find their way to you, through random drops. Then, it’s off to the blacksmith, where you’ll break them down not for some game-changing weapon, but for the ultimate in barbarian haute couture. So, yeah, we’re essentially talking about playing dress-up in the middle of an apocalypse. But hey, who says you can’t slay with style?
A quick disclaimer before we jump to the sets:
There are some armor pieces that are not part of sets, so I won’t include them.
After 200 hours of gameplay we still have 2 Wardrobe slots locked so I’m not sure if those are upcoming rogue armors or they are some sort of legendary drop that is impossible to get. Keep that in mind.
That wraps up our dive into the world of Diablo 4 barbarian armor sets. It’s a hefty collection, right? Each design brings something unique to the table, blending style with that unmistakable barbarian bravado.
However, in my zeal to catalog these treasures, I must admit I overlooked one—the hide set. Yep, slipped right by me without a screenshot. So, consider that the elusive piece of the puzzle still out there, alongside a few locked slots that hint at more to come or some exceptionally rare finds.


![19 Diablo 4 Barbarian Armor Sets [Outfit Transmogs]](https://rpgwire.com/wp-content/uploads/2024/04/Diablo-4-barbarian-armor-sets-and-transmogs-featured-image-1080x675.png)