Welcome to my guide on the best Helldivers 2 stratagems. Why would you need such a list, you might ask. Simple: there are 50+ stratagems and only 4 stratagem slots (if you’re lucky) for every mission. So, you have to adapt and choose the right ones to avoid killing your fellow Helldivers and complete as many objectives as possible.
While 100+ hours might not sound like a lot to most of you, for me that’s practically part-time employment! I’m almost level 60 and while I haven’t tried every single stratagem (some sound like an awful time), I have tried to identify the best ones.
Helldivers 2 stratagems tier list
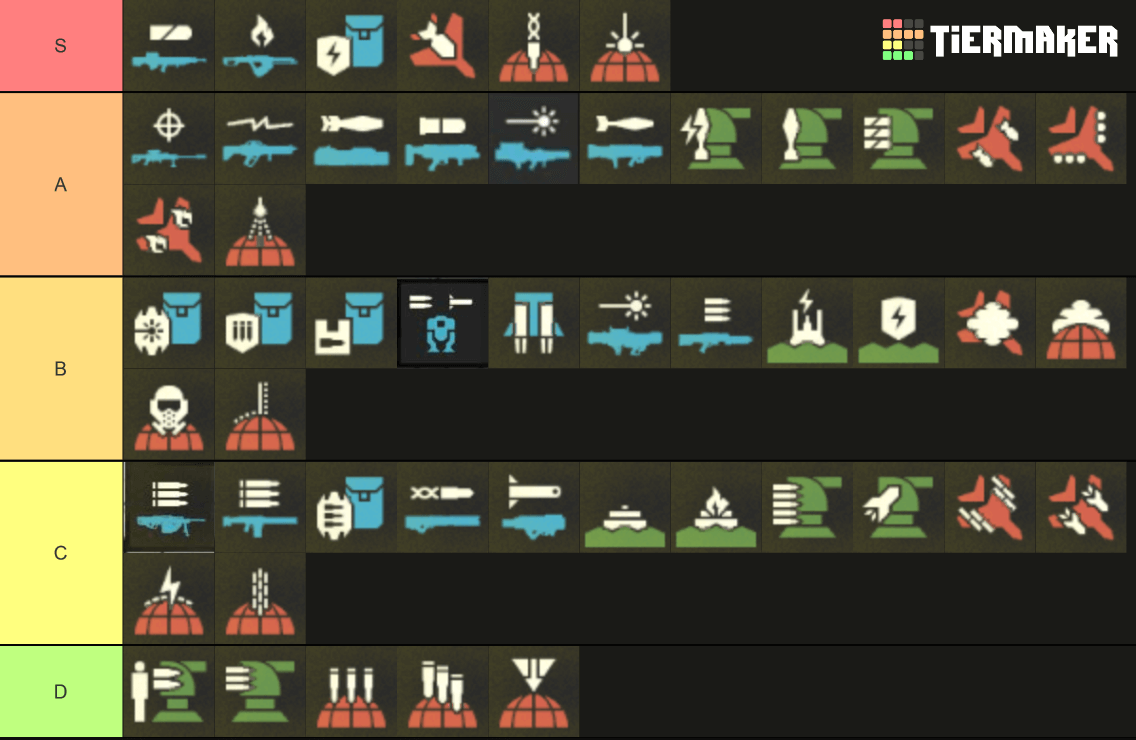
Here’s my TL;DR tier list of the best Helldivers 2 stratagems. Explanations for the choices are provided below. Use this template to share your own tier list and link it in the comments below. I’d love to see what your favorites are.

S-tier stratagems
In my opinion, S-tiers are all-around great stratagems that either one-shot titan-type enemies or lend themselves incredibly well to multiple play styles.

 AC-8 Autocannon: S-tier against automatons. Can’t pierce heavy armor.
 FLAM-40 Flamethrower: S-tier against terminids. Sucks against automatons.
  SH-32 Shield Generator Pack: reliable protection against both enemy types, especially if you don’t like using medium or heavy armor.
  Eagle 500kg Bomb: a bit of a personal choice, although it’s probably an A or B tier. The reason for giving it an S-tier, is the huge damage, 2 charges, and very low cooldown.
  Orbital Rail Cannon Strike: excellent for quickly taking down larger enemies like Chargers, Hulks, or tanks.
 Orbital laser: best offensive stratagem for wiping out automaton bases, swarms, and nests.
A-tier stratagems:
These types of Helldivers 2 stratagems are powerful, or very useful, but may come with drawbacks like limited charges, long cooldowns, or lower effectiveness against certain enemy types, etc.

 APW-1 Anti-Materiel Rifle: the best early-game weapon for taking down large enemies. Great for shooting through a heavy bot’s eyes.
  ARC-3 Arc Thrower: Infinite ammo, shots chain between mobs, and has the ability to take down heavy enemies in 6-10 shots.
 EAT-17 Expendable Anti-tank: excellent anti-heavy armor weapon with super low cooldown. Dosent use a backpack sloth and you get 2 per drop.
 GL-21 Grenade Launcher: great for plugging holes, clearing groups, and dealing with bile spewers.
 Quasar cannon: the best weapon for taking down automaton ships and blasting big terminid enemies, infinite ammo, doesn’t require a backpack. Wolf stopped me from giving it S-tier 🙂
  GR-8 Recoilless Rifle: couldn’t put it down when I unlocked it. Incredibly powerful against large enemies, but reload time is punishing.
  A/M-23 EMS Mortar Sentry: a much better option to the orbital/eagle EMS strike. Keeps enemies stunned and in place.
 A/M-12 Mortar Sentry: hands-down the most powerful sentry in the game. Doesn’t require line of sight, but will kill your teammates without hesitating.
  A/AC-8 Autocannon Sentry: great for short eradicate or defense missions. Good for taking down bigger targets like bile titans.
 Eagle airstrike: available right from the start and incredibly versatile.
  Eagle cluster bomb: love it because it has 5 recharges and good damage.
 Eagle Napalm Airstrike: blows up everything and burns after impact, making it excellent against bugs.
 Orbital Airburst Strike: great against bug breaches. Strikes 3 times in a circle.
B-tier stratagems:
These are strong, fun, and overall powerful stratagems that are quite situational, or need a more complicated setup for maximum impact.

 AX/LAS-5 “Guard Dog” Rover: S-tier when it’s not shooting you in the head. Only recommended against terminids.
  SH-20 Ballistic Shield Backpack: very good against automatons, especially destroyers. Requires a specific setup for maximum impact.
 B-1 Supply Pack: useful when playing in four-man parties or paired with machine guns and grenade launchers.
  EXO-45 Patriot Exosuit: I strongly recommend this for eradicate, search & destroy, or egg missions (terminids). Not a good choice against automatons.
 LIFT-850 Jump Pack: I use it often in my playstyle because it’s fun, and because it gives me higher mobility while fighting bugs.
  LAS-98 Laser Cannon: for me, it has lost its purpose since the quasar cannon came out. It also requires you to mostly stay still, which we all know is hard to do in Helldivers.
  M-105 Stalwart: the lighter version of the machine gun, with better load time. Combos well with the supply pack.
 A/ARC-3 Tesla Tower: incredibly powerful against terminids, but can easily kill allies.
  FX-12 Shield Generator Relay: good protection, lends itself well to automaton extermination and personnel rescue missions. Useless against bugs.
 Eagle Smoke Strike: excellent for stealth play.
 Orbital Smoke Strike: another option for stealth play. Better against Robots because it breaks line of sight.
 Orbital Gas Strike: very powerful against terminids. Not good against robots.
 Orbital Walking Barrage: similar to the 380mm but throws salvos in front of you. Powerful if positioned correctly.
C-tier stratagems:
C-tier stratagems are a MEH at best for me. I rarely ever use them, simply because there are better options in the game:

 MG-43 Machine Gun: Stalwart is a much better choice because it’s faster to aim and move with. Standing still is not really an option in this game.
 MG-206 Machine Gun: quite powerful and combos well with the supply back. Doesn’t have a crosshair in third-person.
 AX/AR-23 “Guard Dog”: the AX/LAS-5 “Guard Dog” Rover is simply better. This one has less ammo, so it needs to recharge. It’s also more adapt at killing teammates.
  RS-422 Railgun: this was one of the best weapons before the nerf. Now it’s a jack of all trades, master of none.
 FAF-14 SPEAR Launcher: probably gonna be A- or S-tier when they fix targeting. For now avoid it.
 MD-6 Anti-Personnel Minefield: I have a theory that enemies are programmed to avoid these mines as soon as you place them down and your buddies are programmed to step on them.
 MD-I4 Incendiary Mines: same as anti-personnel minefield.
  A/G-16 Gatling Sentry: better than the machine gun sentry. Not effective against armored enemies. Unreliable and ends up shooting allies chaotically.
 A/MLS-4X Rocket Sentry: I like this sentry but it’s very unreliable and usually ends up killing your teammates.
  Eagle Strafing Run: Pops intently and has a predictable path. Not that destructive though.
 Eagle 110MM Rocket Pods: a decent quick-fire eagle strike available at lower levels. There are more powerful options available later.
 Orbital EMS Strike: this is a very underrated stratagem, but the fact that it requires comboing and coordination is the reason I gave it a C-tier. Works like a charm when you pair it with a 500KG. Suitable for hit-and-run tactics.
 Orbital Gatling Barrage: the only reason this isn’t a D-tier is because it unlocks at level 2.
D-tier stratagems:
These are the stratagems that I would never choose unless someone pointed a gun at my head because they simply suck.

 E/MG-101 HMG Emplacement: yes, it’s powerful & fun, but who’s going to stand still?
  A/MG-43 Machine Gun Sentry: objectively the weakest sentry.
 Orbital 120mm HE Barrage: just no.
 Orbital 380 HE barrage: I’ve never seen someone fire this without killing a teammate. Super slow and hits completely randomly.
 Orbital Precision Strike: most unreliable Helldivers 2 stratagem.
Helldivers 2 stratagems codes (cheat sheet)
Stratagems are a major part of how you play. They’ll eventually become like second nature. Until then, use this cheat sheet. I’ve organized the codes into four major sections:
-
- Offensive stratagems: enable the use of heavy ordnance, firebombs, and airstrikes.
- Defensive stratagems: provide turrets, towers, shields, and mines to defend against enemies.
- Supply stratagems: deliver defensive drones, utility packs, ammo, and heavy weapons.
- Mission stratagems: become available while you are close to a relevant objective.
Here are the input codes and most important details for all the Helldivers 2 stratagems:
Since mission stratagems are very situational, I’ll just list them in a separate table:
These are all the Helldivers 2 stratagem codes. If new stratagems become available, they will be added to the tables and highlighted for quick access.
Wrapping up
Thanks for sticking through this rundown of the best Helldivers 2 stratagems. As with any article of this type, these are my PERSONAL opinions. If you don’t agree with them, feel free to let me know in the comments. Also, I hope you find the stratagems useful. I was using cheat sheets a lot when the game was still buggy and my UI kept disappearing completely.
If you have any feedback or an insanely powerful combo you’d like to share, I’d love to know about it. I love the fact that Helldivers keeps every mission fresh by giving players so many tools for diversifying their game style.
I strongly advise you to try out all the Helldivers stratagems, pair them with different armors and weapons, and tailor your loadout to match every mission scenario.


![19 Diablo 4 Barbarian Armor Sets [Outfit Transmogs]](https://rpgwire.com/wp-content/uploads/2024/04/Diablo-4-barbarian-armor-sets-and-transmogs-featured-image-1080x675.png)

0 Comments